
Table of Contents
Indigo REST API
NOTE : this API was deprecated in Indigo v2022.2.
These REST semantics are loosely based RoR's use of RESTful URLs.
Devices Access
Examples to get HTML, JSON (new in Indigo 6), XML, and TXT versions of the device list:
http://127.0.0.1:8176/devices/
http://127.0.0.1:8176/devices.json/
http://127.0.0.1:8176/devices.xml/
http://127.0.0.1:8176/devices.txt/
Examples to get HTML, XML, and TXT versions of device “office-lamp”:
http://127.0.0.1:8176/devices/office-lamp.html
http://127.0.0.1:8176/devices/office-lamp.json
http://127.0.0.1:8176/devices/office-lamp.xml
http://127.0.0.1:8176/devices/office-lamp.txt
Example of editing using HTML form to modify office-lamp editable properties; Form submit will do a virtual PUT to update the properties:
http://127.0.0.1:8176/devices/office-lamp/edit
Example use of curl and virtual HTTP PUT call to change brightness to 27; HTTP result is a 303 redirect back to the device resource after the update is complete:
curl -X PUT -d brightness=27 http://127.0.0.1:8176/devices/office-lamp
http://127.0.0.1:8176/devices/office-lamp?brightness=27&_method=put
Example use of curl and virtual HTTP PUT call to change office-lamp's isOn to False and True:
curl -X PUT -d isOn=0 http://127.0.0.1:8176/devices/office-lamp
curl -X PUT -d isOn=1 http://127.0.0.1:8176/devices/office-lamp
http://127.0.0.1:8176/devices/office-lamp?isOn=0&_method=put
http://127.0.0.1:8176/devices/office-lamp?isOn=1&_method=put
Example use of curl and virtual HTTP PUT call to toggle office-lamp's state:
curl -X PUT -d toggle=1 http://127.0.0.1:8176/devices/office-lamp
http://127.0.0.1:8176/devices/office-lamp?toggle=1&_method=put
Example use of curl and virtual HTTP PUT call to change speedIndex to 0 (off), 3 (high), then decrease back to 0 (off):
curl -X PUT -d speedIndex=0 http://127.0.0.1:8176/devices/office-ceiling-fan
curl -X PUT -d speedIndex=3 http://127.0.0.1:8176/devices/office-ceiling-fan
curl -X PUT -d speedIndex=dn http://127.0.0.1:8176/devices/office-ceiling-fan
curl -X PUT -d speedIndex=dn http://127.0.0.1:8176/devices/office-ceiling-fan
curl -X PUT -d speedIndex=dn http://127.0.0.1:8176/devices/office-ceiling-fan
http://127.0.0.1:8176/devices/office-ceiling-fan?speedIndex=0&_method=put
http://127.0.0.1:8176/devices/office-ceiling-fan?speedIndex=3&_method=put
http://127.0.0.1:8176/devices/office-ceiling-fan?speedIndex=dn&_method=put
http://127.0.0.1:8176/devices/office-ceiling-fan?speedIndex=dn&_method=put
http://127.0.0.1:8176/devices/office-ceiling-fan?speedIndex=dn&_method=put
Example use of curl and virtual HTTP PUT call to change device “irrmaster-pro” active sprinkler zone to 3 and all off:
curl -X PUT -d activeZone=3 http://127.0.0.1:8176/devices/irrmaster-pro
curl -X PUT -d activeZone=0 http://127.0.0.1:8176/devices/irrmaster-pro
http://127.0.0.1:8176/devices/irrmaster-pro?activeZone=3&_method=put
http://127.0.0.1:8176/devices/irrmaster-pro?activeZone=0&_method=put
Example use of curl and virtual HTTP PUT call to change device “irrmaster-pro” sprinkler mode:
curl -X PUT -d activeZone=stop http://127.0.0.1:8176/devices/irrmaster-pro
curl -X PUT -d activeZone=run http://127.0.0.1:8176/devices/irrmaster-pro
curl -X PUT -d activeZone=pause http://127.0.0.1:8176/devices/irrmaster-pro
curl -X PUT -d activeZone=resume http://127.0.0.1:8176/devices/irrmaster-pro
curl -X PUT -d activeZone=next http://127.0.0.1:8176/devices/irrmaster-pro
curl -X PUT -d activeZone=prev http://127.0.0.1:8176/devices/irrmaster-pro
http://127.0.0.1:8176/devices/irrmaster-pro?activeZone=stop&_method=put
http://127.0.0.1:8176/devices/irrmaster-pro?activeZone=run&_method=put
http://127.0.0.1:8176/devices/irrmaster-pro?activeZone=pause&_method=put
http://127.0.0.1:8176/devices/irrmaster-pro?activeZone=resume&_method=put
http://127.0.0.1:8176/devices/irrmaster-pro?activeZone=next&_method=put
http://127.0.0.1:8176/devices/irrmaster-pro?activeZone=prev&_method=put
Example use of curl and virtual HTTP PUT call to change device “thermostat” heat and cool setpoints:
curl -X PUT -d setpointCool=68 -d setpointHeat=84 http://127.0.0.1:8176/devices/thermostat
curl -X PUT -d setpointCool=72 -d setpointHeat=78 http://127.0.0.1:8176/devices/thermostat
curl -X PUT -d setpointCool=up -d setpointHeat=up http://127.0.0.1:8176/devices/thermostat
curl -X PUT -d setpointCool=dn -d setpointHeat=dn http://127.0.0.1:8176/devices/thermostat
http://127.0.0.1:8176/devices/thermostat?_method=put&setpointCool=68&setpointHeat=84
http://127.0.0.1:8176/devices/thermostat?_method=put&setpointCool=72&setpointHeat=78
http://127.0.0.1:8176/devices/thermostat?_method=put&setpointCool=up&setpointHeat=up
http://127.0.0.1:8176/devices/thermostat?_method=put&setpointCool=dn&setpointHeat=dn
Example use of curl and virtual HTTP PUT call to change device “thermostat” hvac mode to “cool on” and “auto on”:
curl -X PUT -d hvacCurrentMode="cool on" http://127.0.0.1:8176/devices/thermostat
curl -X PUT -d hvacCurrentMode="auto on" http://127.0.0.1:8176/devices/thermostat
http://127.0.0.1:8176/devices/thermostat?_method=put&hvacCurrentMode=cool%20on
http://127.0.0.1:8176/devices/thermostat?_method=put&hvacCurrentMode=auto%20on
Example use of curl and virtual HTTP PUT call to change device “thermostat” hvac fan mode to “always on” and “auto on”:
curl -X PUT -d hvacFanMode="always on" http://127.0.0.1:8176/devices/thermostat
curl -X PUT -d hvacFanMode="auto on" http://127.0.0.1:8176/devices/thermostat
http://127.0.0.1:8176/devices/thermostat?_method=put&hvacFanMode=always%20on
http://127.0.0.1:8176/devices/thermostat?_method=put&hvacFanMode=auto%20on
Example use of curl and virtual HTTP PUT call to change binary output state of an EZIO module device “garage-io”:
curl -X PUT -d outputBinaryStates="0,0,0,0,1,1,1,1" http://127.0.0.1:8176/devices/garage-io
curl -X PUT -d outputBinaryStates="1,0,1,0,0,0,0,0" http://127.0.0.1:8176/devices/garage-io
curl -X PUT -d outputBinaryStates="set4" http://127.0.0.1:8176/devices/garage-io
curl -X PUT -d outputBinaryStates="clear4" http://127.0.0.1:8176/devices/garage-io
http://127.0.0.1:8176/devices/garage-io?_method=put&outputBinaryStates=0,0,0,0,1,1,1,1
http://127.0.0.1:8176/devices/garage-io?_method=put&outputBinaryStates=1,0,1,0,0,0,0,0
http://127.0.0.1:8176/devices/garage-io?_method=put&outputBinaryStates=set4
http://127.0.0.1:8176/devices/garage-io?_method=put&outputBinaryStates=clear4
Variable Access
Examples to get HTML, JSON (new in Indigo 6), XML, and TXT versions of the variable list:
http://127.0.0.1:8176/variables/
http://127.0.0.1:8176/variables.json/
http://127.0.0.1:8176/variables.xml/
http://127.0.0.1:8176/variables.txt/
Examples to get HTML, JSON (new in Indigo 6), XML, and TXT versions of variable “sprinklerDurationMultiplier”:
http://127.0.0.1:8176/variables/sprinklerDurationMultiplier.html
http://127.0.0.1:8176/variables/sprinklerDurationMultiplier.json
http://127.0.0.1:8176/variables/sprinklerDurationMultiplier.xml
http://127.0.0.1:8176/variables/sprinklerDurationMultiplier.txt
Example use of curl and virtual HTTP PUT call to change variable “sprinklerDurationMultiplier” value to 1.23; HTTP result is a 303 redirect back to the variable resource after the update is complete:
curl -X PUT -d value=1.23 http://127.0.0.1:8176/variables/sprinklerDurationMultiplier
http://127.0.0.1:8176/variables/sprinklerDurationMultiplier?_method=put&value=1.23
And, while not exactly RESTful, here's the URL you can use in your custom control pages to link to an editor page for a variable (select “Link to External URL” on the “Client action” popup and insert the following):
/editvarpage?name=SOME_VARIABLE_NAME&redirectPage=RETURN_PAGE_NAME
That replaces the variable plugin that's in the user contribution library.
Action Group Access and Execution
Examples to get HTML, JSON (new in Indigo 6), XML, and TXT versions of the action group list:
http://127.0.0.1:8176/actions/
http://127.0.0.1:8176/actions.json/
http://127.0.0.1:8176/actions.xml/
http://127.0.0.1:8176/actions.txt/
Examples to get HTML, JSON (new in Indigo 6), XML, and TXT versions of action group “cooking scene”:
http://127.0.0.1:8176/actions/cooking%20scene.html
http://127.0.0.1:8176/actions/cooking%20scene.json
http://127.0.0.1:8176/actions/cooking%20scene.xml
http://127.0.0.1:8176/actions/cooking%20scene.txt
Example use of curl and virtual HTTP execute call to execute action group “party scene”:
curl -X EXECUTE http://127.0.0.1:8176/actions/party%20scene
http://127.0.0.1:8176/actions/party%20scene?_method=execute
INSTEON Links Retrieval
Example to get XML version (HTML, JSON and TXT not available) of the INSTEON links:
http://127.0.0.1:8176/insteonlinks/
Example to get XML INSTEON links for device “office-lamp”:
http://127.0.0.1:8176/insteonlinks/office-lamp
Example to get XML INSTEON links for the PowerLinc:
http://127.0.0.1:8176/insteonlinks/PowerLinc%20Interface
Authentication
As of v2021.1, Indigo now supports both basic and digest HTTP authentication simultaneously, and offers a new API key feature for use with the API. To use either of the HTTP authentication methods, you must have a username/password set in the Start Local Server dialog.
HTTP Authentication
HTTP Digest authentication is the default authentication method for the REST API. To use it in the curl examples above, you can specify your authentication like this:
curl -u user:password --digest [other options here]
In Python, we recommend using the requests library (included with Indigo and available to Indigo Python scripts):
import requests
from requests.auth import HTTPDigestAuth
reply = requests.get('https://myreflector.indigodomo.net/', auth=HTTPDigestAuth('username', 'password'))
Of course, you would use the full REST URL. That will allow your scripts to successfully authenticate and execute against a protected server.
If you have HTTP Basic authentication enabled in the Start Local Server dialog, you can pass the username and password on the URL itself (note that this is less secure and should only be used on HTTPS connections since the password is sent in clear text on non-HTTPS URLs):
https://username:password@myreflector.indigodomo.net/
We don't enable Basic auth by default because it is less secure than Digest auth, but we make it available when you have no other option to integrate from an outside source.
API Key
In Indigo 2021.1 or later, you can use an even more secure API token to authenticate your REST requests.
Note: To use API Keys with the REST API, you must have an active Indigo Up-to-Date subscription.
To use keys to authenticate REST calls, you must first generate an API Key in your Indigo Account. Log in and select the Authorizations item in the navigation menu on the left. This will show you a page that looks something like this:
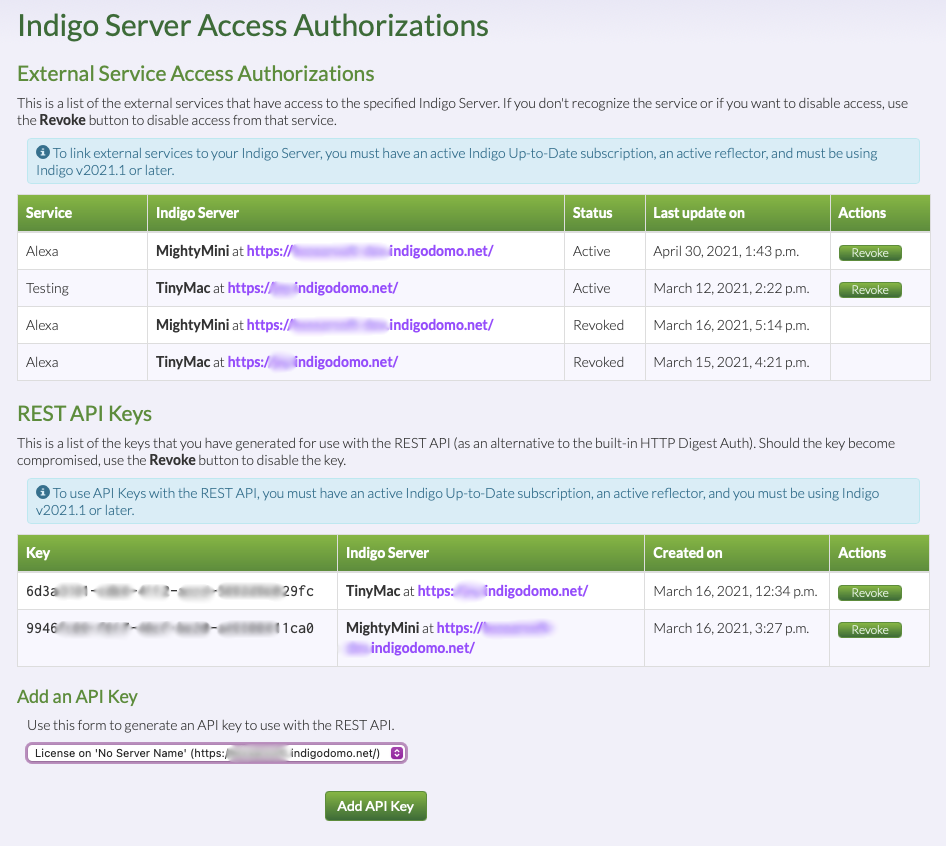
The lower section of the page shows your API Keys. You can generate a new key by selecting your license from the popup at the bottom and clicking the Add API Key button. This will generate a key that is valid on the license specified (most users just have a single license, but some have multiple).
Next, when you make a call to the REST API, you will include the Authorization header with the value of 'Bearer API_KEY_HERE'. In curl:
curl -H "Authorization: Bearer API_KEY_HERE" [other options here]
In Python:
import requests
my_headers = {"Authorization": "Bearer API_KEY_HERE"}
reply = requests.get('https://myreflector.indigodomo.net/', headers=my_headers)
Again, you would use the full REST URL rather than just the host.
AppleScript & the RESTful API
To work around the Mac OS X “application isn't running” bug (error -600) that seems to be getting worse with each OS release, you can communicate between an external AppleScript (or app that runs AppleScripts) by using the curl command in a do shell script AppleScript call with the commands above to set (and get) information from the Indigo server.
For example, here's a simple AppleScript that will turn an Indigo device ON and then OFF:
set indigoServerIPandPort to "192.168.1.123:8176"
set indigoServerUsername to "username here"
set indigoServerPassword to "password here"
set devName to "office%20lamp" -- note spaces have to escaped by substituting with %20
set turnOffCommand to "curl -u " & indigoServerUsername & ":" & indigoServerPassword & " --digest -X PUT -d isOn=0 http://" & indigoServerIPandPort & "/devices/" & devName
set turnOnCommand to "curl -u " & indigoServerUsername & ":" & indigoServerPassword & " --digest -X PUT -d isOn=1 http://" & indigoServerIPandPort & "/devices/" & devName
do shell script turnOnCommand
do shell script turnOffCommand
And here's a simple AppleScript that will set the value of an Indigo variable:
set indigoServerIPandPort to "192.168.1.123:8176"
set indigoServerUsername to "username here"
set indigoServerPassword to "password here"
set varName to "someVariable"
set varValue to "hello"
set commandString to "curl -u " & indigoServerUsername & ":" & indigoServerPassword & " --digest -X PUT -d value=varValue http://" & indigoServerIPandPort & "/variables/" & varName
do shell script commandString
Here's an example of getting a variable value:
set varValueJson to do shell script "curl -u username:password --digest http://127.0.0.1:8176/variables/someVariable.json"

tell application "JSON Helper"
	set varValueRecord to read JSON from varValueJson
	set varValue to value of varValueRecord
end tell
Note, to use this script you need the Mac App called JSON Helper, which is free from the Mac App Store. This free app does a fantastic job of converting JSON formatted data into AppleScript native data types (like lists and records).
This approach has the advantage of running from any Mac anywhere, whether on the same Mac as your server, another Mac on your local network, or a Mac somewhere out on the internet (use your reflector URL if you're doing the latter).
You can also have AppleScript directly communicate with Indigo's python scripting engine as shown here. That is a slower technique but doesn't use Indigo's Web server and thus doesn't need the username or password embedded in the script.