Table of Contents
Create a Water Detector with a TriggerLinc
Water detectors can be expensive, and if you have one, you probably need more. If you've ever had a bad leak, and I have, the thousands of dollars in damage repairs can quickly offset the cost of a few strategically placed detectors. To keep the costs down, and allow me to install more detectors in my house, I've created cheaper battery powered one that almost anyone can assemble. The completed unit costs under $60 in parts.
Difficulty rating
Easy if you know how to use a screwdriver, and create Triggers in Indigo. It takes about 40 minutes to build and test if you've never built one before.
What you need to start
- EZSnsLQD Surface Mount Liquid Sensor [http://store.indigodomo.com/surface-mount-liquid-sensor-ezsnslqd-1010a.html]
- Small screwdriver for prying open the TriggerLinc case
- Very small screwdriver such as used to repair sunglasses
- Sticky tape or a few small screws for mounting the TriggerLinc and EZSnsLQD
Ideas on placement to detect water
- Behind a toilet
- Under a sink
- Near a HVAC unit, if it's indoors
- On your basement floor
- Near an ice maker
How to assemble and install it
The idea here is simply open the case of the TriggerLinc, and screw down the the EZSnsLQD wires to the terminal block inside the TriggerLinc. Note the TriggerLinc comes in two pieces. One is smaller, and is essentially a magnet in a little case. You won't need it for this project. Set it aside for another another project for another day.
- Open the case of the TriggerLinc with a small (about 1/4“) screwdriver. Note there is a tab where you can stick the screwdriver in. The case pops off easily.

- Holding the opened TriggerLinc in your hand, turn it around so that the battery is facing towards you, and locate the small black terminal block in the upper left corner, above the battery. The black terminal block is a connection for your wires, and has two small, silver screws on top. You'll need a very small screwdriver to open and close these screws.
- The EZSnsLQD has a long wire casing, and on one end, a red and a black wire stick out of it. Now you need to insert the wires into the black terminal block. Unscrew each terminal screw, and stick a wire from the EZSnsLQD into it on the left side of the back terminal block so that most (or all) of the silver exposed part is inside the black terminal block. Now screw down the screw so it's snugly holding the silver part of the wire. Do the same thing for the other wire in the other hole in the black terminal black block. Don't worry about which color wire goes in which hole - it doesn't matter - just make sure one color goes into each hole.
- There is a small, black jumper that's above the battery, but more towards the right - towards the center of the battery. That jumper should be “jumped” meaning the little black tab should be across both pins of the jumper. This is important to set so that Indigo can see when the water detection status changes - when the sensor goes from dry to wet, and back again. Now put the AA battery into place so the TriggerLinc has power for the next step.
- Add the TriggerLinc device into Indigo by pressing and holding the TriggerLinc small button between the jumper and the black terminal block for a moment. The TriggerLinc will register in Indigo, and a you configure it just as any other device in Indigo. Once configured, create an Indigo Trigger that looks like this:
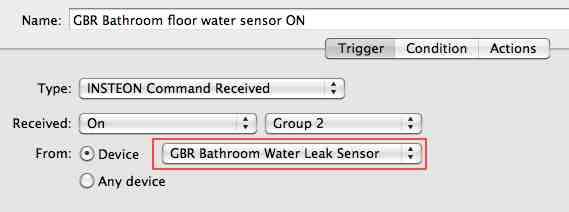
This will allow for something to happen when the water is detected, since the it is looking forReceived OnfromGroup 2. Note you need to set your own name of your TriggerLinc you just created in Indigo. In the picture, this is outlined in red. Once the Trigger is created, add an Action such as an email to you, a Growl, or maybe speak a warning or flash some lights; whatever gets your attention so you can stop the water leak. - Once both wires are securely screwed in the black terminal block, snap back on the case for the TriggerLinc, making sure to run the wires out the side through the plastic cap. We're now ready for testing.
- You now should have the wires from the EZSnsLQD attached to the TriggerLinc. Before we do a final test, let's try a quick one. On one hand, lick (or stick in a cup of water) your index and middle fingers. Now quickly touch one wet finger to each of the silver bars on either side of the EZSnsLQD, thus making a connection across the bars, and simulating it detecting water. Within about one second of touching the silver bars, you should see a sensor status change in Indigo. Release your fingers, and you should see Indigo indicate another status - but the opposite one - now indicating the EZSnsLQD is dry.
- Assuming the quick test worked above (and if not, see Troubleshooting below), mount the EZSnsLQD with it's silver contacts pointed to where you want it to detect water. On the floor, the silver contacts would pointed down so it can detect water if it reaches a depth of about 1/16” off the floor. Now, for a final test, spill a little water around the EZSnsLQD silver contacts. Remember, it doesn't take much, and you should see Indigo register the water because of the Indigo Trigger you created above. If you're Trigger isn't working, the Indigo Log will register the status change.

Troubleshooting
If you don't have success above, check to make sure you have a good AA battery, that it's installed in its battery clips snugly and positioned the right way, that your wires from the EZSnsLQD are snugly in the black terminal block, and that the jumper is “jumped”.
Advantages
- Battery powered means it can be placed in an awkward location, like behind a toilet or under a sink where power may not be accessible.
- The EZSnsLQD can detect water over and over again - it's not a single use solution.
- It's cheaper than most water detection systems.
- It's easy to test with a small water spill, or the TriggerLinc can be tested by getting a small magnet close to it. You can use the one it came with that put aside.
Drawbacks
- The TriggerLinc unit is not designed for outdoor use. Make sure it never gets immersed in water. Only the EZSnsLQD is designed to get wet.
- The battery in the TriggerLinc can run out, and you have no way of polling it that I know of yet. Best to check it every 6 months to be sure.
- If any magnets come close to the TriggerLinc, it will give you a false-positive on water detection.
- If the TriggerLinc does detect water, it will alert you, but after the water is cleaned up, and the EZSnsLQD is drying out, it may send false warnings indicating sensing water or no-water signals. Be patient, as it may need to try out for a few hours before being ready to accurately be used again.
Advanced Indigo Configuration
While you only need one Trigger defined to detect water, I added a second Trigger on Received On and Group 1 so I could detect when the water had dried up. It's not really needed, but I like to know when an alarm clears as well.
If you have any questions about building this, private message (PM) me on the Indigo Forum