Table of Contents
Email+
The Email+ plugin is based on the Better Email plugin, which has been around for many years and is rock solid. With Indigo 2021.1 and the port to the M1 processor, we decided it was time to move away from our very old email solution to something that was newer and had more features. The plugin author graciously allowed us to include it with Indigo. We changed the name to avoid any confusion.
Note: this plugin was added in the Indigo 2021.1 installer. If you were using the Better Email plugin from the Plugin Store before you upgraded, the upgrade process should have worked seamlessly and you shouldn't need to do much. The one thing you may need to change are any scripts that send emails using the Better Email plugin: you will need to change the id to com.indigo.email (see the Scripting Emails section below for details). The same applies to other plugins that were subscribing to broadcast messages.
Use the Email+ forum for questions about this plugin. For users of Indigo prior to 2021.1, we highly recommend that you use the Better Email Plugin (which we've left in the Plugin Store). You won't be able to install Better Email in Indigo versions starting with 2021.1 since they are basically the same plugin.
Email Devices and Usage
The plugin provides three types of Indigo devices: you must create instances of the device types below to be able to send and receive emails.
Sending Emails (SMTP Server devices)
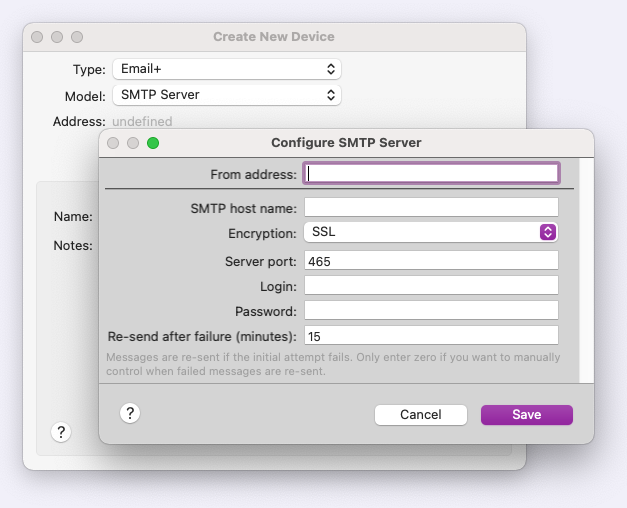
The SMTP Server is the device type used for sending emails. To send an email, you first need to create an SMTP device.
If you had a previous version of Indigo configured to send emails, the upgrade process will create this server for you based on your prior settings. The name of that server will be Email+ SMTP Server.
In Indigo, create a new device, in the Type popup select Email+ and for Model select SMTP Server
You will need to confirm your settings with your email provider. We highly recommend using a dedicated email address for Indigo, particularly if you are performing email scans.
Sending an Email
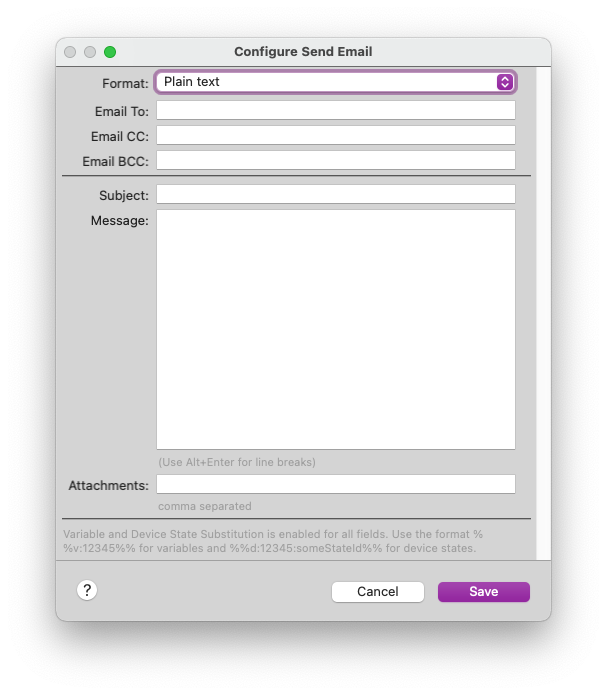
In the Actions tab, you can use the Notification Actions→Send Email action to send an email:
The format can be either plain text or HTML (it is your responsibility to ensure that the Message field contains a valid HTML document - we don't attempt to validate it). Variable (%%v:VariableIDHere%%) and device state (%%d:DeviceIDHere:StateIDHere%%) substitutions are available in all fields, and you can specify attachments by entering the full path to a file, each file separated by commas.
Sending Event Log Data
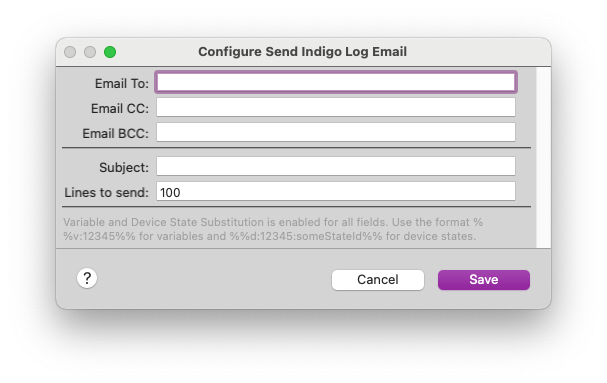
In the Actions tab, you can use the Email+ Actions→Send Indigo Log Email action to send parts of your Event Log lines:
Variable (%%v:VariableIDHere%%) and device state (%%d:DeviceIDHere:StateIDHere%%) substitutions are available in all fields.
Email Queue Management Menu Items
You can use the Plugins→Email+→Clear All Email Queues to clear out all queued emails from all of your SMTP servers. If your email server is having issues, you may find that you want to clear out all pending emails that the plugin has queued up for your email server.
You can use the Plugins→Email+→Clear Email Queue… to clear out the email queue for a specific SMTP server.
Receiving Emails
There are two server types for receiving email: IMAP, which is the most fully-featured and is the best option, and POP, an older protocol used by older mail providers.
IMAP Server
This is the primary device type used for scanning incoming emails. Note: we highly recommend using a dedicated email account for Indigo since there is post-processing that can happen and we don't want accidental email deletions in an account that's used for other things.
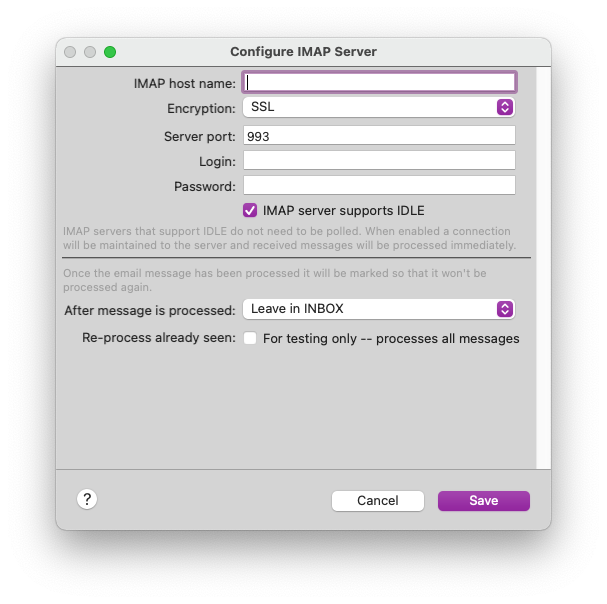
In Indigo, create a new device, in the Type popup select Email+ and for Model select IMAP Server
When configuring your IMAP device, you will need to confirm the settings with your email provider. The defaults for Encryption and Server Port are usually correct, though that is provider specific. Most email providers Use IDLE, but if things don't seem to be working you can check with your provider for this setting.
There are 3 options for the After Message is processed field:
Leave in INBOX(default) - this is the safest option if you are using this email address for other things. It can lead to an ever growing email list, so you'll need to delete messages yourself once you're sure you are done with them.Delete Message- if you are using a dedicated email address for Indigo, this is a good option since it will delete a message after it's been processed. This will keep the inbox from growing uncontrollably.Move Message- this is a compromise of the two options above: it keeps the INBOX clean but it also keeps all emails if you want to manually manage them.
The Check All button is really used for testing - it will process all emails regardless of whether they have been processed in the past or not.
IMAP Mailbox Naming
When using the option to move processed messages to another mailbox, instead of deleting or leaving in the Inbox, you'll need to specify the name of the destination mailbox. Unfortunately, the naming scheme for IMAP mailboxes is server specific.
There are two primary traits of the naming scheme that vary between servers. First, some servers require all mailboxes to be relative to the INBOX. Others do not. Second, the delimiter used in the mailbox path is not fixed. Most servers use either “/” or “.”.
So, for a top level mailbox called “Processed”, the most probable names to put in the destination folder field are:
- Processed
- INBOX/Processed
- INBOX.Processed
To provide some hints that might help determine the correct naming, if the plugin logging is set to “Detailed Debugging Messages” it will query the IMAP server for the list of names of the top-level mailboxes. The log will show something like this:
 Email+ Threaddebug        Indigo IMAP: Mailbox list:
 Email+ Threaddebug        Indigo IMAP:    Mailbox: (\Drafts \NoInferiors) "/" Drafts
 Email+ Threaddebug        Indigo IMAP:    Mailbox: (\HasNoChildren) "/" INBOX
 Email+ Threaddebug        Indigo IMAP:    Mailbox: (\NoInferiors) "/" OUTBOX
 Email+ Threaddebug        Indigo IMAP:    Mailbox: (\HasNoChildren) "/" Processed
 Email+ Threaddebug        Indigo IMAP:    Mailbox: (\Sent \NoInferiors) "/" Sent
 Email+ Threaddebug        Indigo IMAP:    Mailbox: (\Junk \NoInferiors) "/" Spam
 Email+ Threaddebug        Indigo IMAP:    Mailbox: (\Trash \HasNoChildren) "/" Trash
The “/” specifies that the delimiter between name parts is “/”.
POP Server
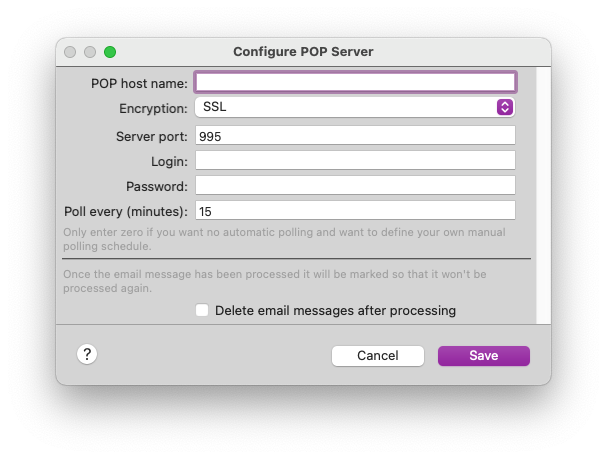
This is an alternative device type used for scanning incoming emails. It is an older protocol but may be the only option you have from your email provider.
If you had a previous version of Indigo configured with email scanning, the upgrade process will create this server for you based on your prior settings. The name of that server will be Email+ POP Server.
In Indigo, create a new device, in the Type popup select Email+ and for Model select POP Server
Again, if you want to use POP you'll need to confirm the settings with your email provider.
Incoming Email Events
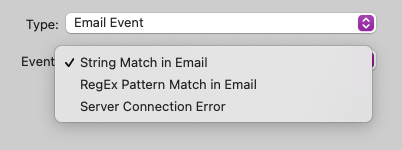
There are a few events that can be used to fire triggers in Indigo. In the Trigger dialog, select Email Event:
You can use these events to monitor incoming emails (and email errors). You can specify either an IMAP or a POP server as described above.
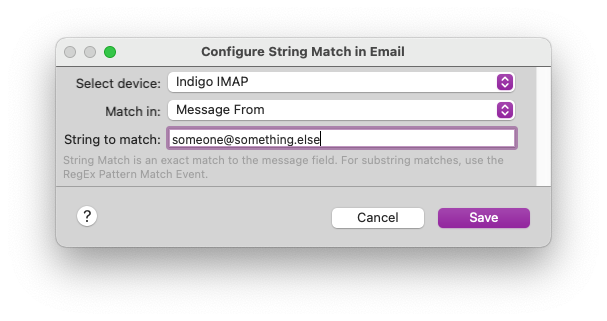
String Match in Email- this event will allow you to perform exact matches in the subject or body of an email, or the sender of the email.RegEx Pattern Match in Email- this will allow you to use regular expressions to match some subset of text in the above 3 fields.Server Connection Error- this will fire a trigger when there is some kind of error in any of the 3 server types above.
Broadcast Messages
Other plugin developers can subscribe to messages from the Email+ plugin when emails are sent or received:
MessageType: messageReceived
Returns dictionary:
{
	'messageFrom':  	<text string>,
	'messageTo': 		<text string>,
	'messageSubject': 	<text string>,
	'messageText': 		<text string>
}

MessageType: messageSent
Returns dictionary:
{
	'messageFrom':  	<text string>,
	'messageTo': 		<text string>,
	'messageSubject': 	<text string>,
	'messageText': 		<text string>
}
The plugin id for the plugin is com.indigodomo.email
Tips on IMAP Mailbox Naming
When using the IMAP device option to move processed messages to another mailbox, instead of deleting or leaving in the Inbox, you'll need to specify the name of the destination mailbox. Unfortunately, the naming scheme for IMAP mailboxes is server specific.
There are two primary traits of the naming scheme that vary between servers. First, some servers require all mailboxes to be relative to the INBOX. Others do not. Second, the delimiter used in the mailbox path is not fixed. Most servers use either “/” or “.”.
So, for a top level mailbox called “Processed”, the most probable names to put in the destination folder field are:
- Processed
- INBOX/Processed
- INBOX.Processed
To provide some hints that might help determine the correct naming, if the plugin logging is set to “Detailed Debugging Messages” it will query the IMAP server for the list of names of the top-level mailboxes. The log will show something like this:
   Email+ Threaddebug        Indigo IMAP: Mailbox list:
   Email+ Threaddebug        Indigo IMAP:    Mailbox: (\Drafts \NoInferiors) "/" Drafts
   Email+ Threaddebug        Indigo IMAP:    Mailbox: (\HasNoChildren) "/" INBOX
   Email+ Threaddebug        Indigo IMAP:    Mailbox: (\NoInferiors) "/" OUTBOX
   Email+ Threaddebug        Indigo IMAP:    Mailbox: (\HasNoChildren) "/" Processed
   Email+ Threaddebug        Indigo IMAP:    Mailbox: (\Sent \NoInferiors) "/" Sent
   Email+ Threaddebug        Indigo IMAP:    Mailbox: (\Junk \NoInferiors) "/" Spam
   Email+ Threaddebug        Indigo IMAP:    Mailbox: (\Trash \HasNoChildren) "/" Trash
The “/” specifies that the delimiter between name parts is “/”.
Scripting Emails
You can send email messages from Python scripts in one of two ways.
First, you can use the built-in sendEmailTo action defined in the Indigo Object Model:
indigo.server.sendEmailTo("my.address@example.com", subject="Subject of email", body="Body of email")
This action will use the first SMTP Server device that is found as most users will only have one.
However, if you have multiple SMTP devices and/or you want to add CC or BCC address, you want to send HTML emails, you want to add attachments, you can directly script the plugin.
The following function can be called from within your scripts. Be sure to put in the correct email address and the deviceID for an Email+ SMTP device.
def sendAlertEmail(subject, message):
    plugin = indigo.server.getPlugin("com.indigodomo.email")
    if plugin.isEnabled():
        plugin.executeAction("sendEmail", deviceId=12345678, props={'emailTo':'foo@bar.com', 'emailSubject': subject, 'emailMessage': message})
    return

sendAlertEmail("Test Alert", "This is only a test")
There are additional optional properties you can include:
props = {
    'emailTo': 'address1, address2',
    'emailCC': 'address3, address4',
    'emailBCC': 'address5, address6',
    'emailSubject': 'Message Subject',
    'emailAttachments': 'file1, file2, file3',
    'emailFormat': 'plain'   (or 'html')
    'emailMessage': 'Message text'
}

plugin = indigo.server.getPlugin("com.indigodomo.email")
if plugin.isEnabled():
    plugin.executeAction("sendEmail", deviceId=12345678, props=props)

