Table of Contents
Managing Your Z-Wave® Network
Indigo provides several tools to manage your Z-Wave network. Not only can you create/control/delete devices but you can also manage device associations and scenes. See the Connecting Z-Wave Interfaces section below for details on connecting and configuring your Z-Wave interface.
Tip: if you're having issues with Indigo communicating with some of your Z-Wave devices, look at the position of your Z-Stick. If you have it plugged directly into your Mac then the chances are that the signal range is reduced somewhat. Also, if there are any other electronics close to it (external hard drives, etc.) then you may want to try to move the interface around a little. For the Z-Stick, try a USB hub with connectors on the top that allow you to position it vertically. A word of warning: some users have used short USB extension cables successfully but others have found that these sometimes cause communication errors with the Z-Stick.
Connecting Z-Wave Interfaces
Indigo needs to communicate with your Z-Wave network through a USB interface, so check out our supported interfaces list to see if the interface you want to use has been tested with Indigo.
Install the Appropriate Drivers
The Aeotec Z-Stick Gen5/Gen5+ uses a built-in driver included with Mac OS X (AppleUSBCDC Modem), so you don't need to install any drivers for it. Note that if you move the stick to a different port or if you upgrade to a new OS version you will need to reselect the serial port.
The Aeotec Z-Stick Series 2 interface requires that you install the Silicon Labs VCP Driver Kit for Mac OS X. Make sure you have restarted after the installation process. If you reinstall your OS, then you will need to rerun the driver installer. Warning: Before upgrading macOS to the next major revision, please visit the Announcements section of our forums to see if there are potential issues with the OS update.
The SmartStick+ is a serial interface from HomeSeer that also uses the built-in driver included with Mac OS X (AppleUSBCDC Modem), so you don't need to install any drivers for it. Note that if you move the stick to a different port or if you upgrade to a new OS version you will need to reselect the serial port.
The GoControl QuickStick Combo is an interface that includes both Z-Wave and Zigbee (though Zigbee isn't supported natively in Indigo). It also requires that you install the Silicon Labs VCP Driver Kit for Mac OS X, specifically v5 or later. It will then present 2 new serial ports: GoControl_zwave (which is the one you select) and GoCongrol_zigbee (for the Zigbee interface).
As mentioned before, other Z-Wave Interfaces that support the Z-Wave Serial API may be compatible and those may require other drivers. Check the Interface Hardware list to see what interfaces we've actually tested.
Connecting the Z-Wave Interface
Plug the Z-Stick into an available USB port connected to your Mac. We've done some testing with this interface connected to a USB hub with favorable results (unlike some other INSTEON and X10 interfaces). However, if you experience any type of errors when trying to configure/use the interface you may try plugging the stick directly into a USB port on your Mac.
Tip: We highly recommend that you position your Z-Stick carefully. If you have it plugged directly into your Mac then the chances are that the range is reduced and you may have problems communicating with devices that are physically far away. Also, we recommend getting a powered USB hub that allows the Z-Stick to stand straight up for the best signal. Avoid using USB extension cables as they have been known to cause issues.
Configuring Indigo to use Your Z-Wave Interface
Once you have your interface plugged into a USB port, you can enable and configure Z-Wave in Indigo:
- Choose the
Interfaces→Z-Wave→Enablemenu item. This should cause theConfigure Z-Wavedialog to open automatically (but only the first time you enable Z-Wave - you can select theInterfaces→Z-Wave→Configure…menu item to get back to the configuration dialog later): - The default
Connection TypeofLocal (physical)is correct (assuming you've plugged your Z-Stick directly into your Mac). - On the
Serial Portpopup, you should select the serial port titledSLAB_USBtoUART(for Z-Stick Series 2) or one that starts withusbmodem(for Z-Stick Gen5), depending on which Z-Stick version you have. If you have two serial ports that start withSLAB_USBtoUARTthat means that you have multiple devices that use the Silicon Labs VCP driver - you'll just need to try each one to determine which is the correct port if you don't know beforehand. Unfortunately, that driver doesn't handle multiple devices using the Silicon Labs chip very well, and that number may change when you reboot. - Unless instructed by Perceptive Automation support, you should leave the
Show debug logging of interface communicationcheckbox unchecked. - Save the
Configure Z-Wavedialog.
Enabling and Disabling Z-Wave Communication
Choose the Interfaces→Z-Wave→Disable (or Enable) menu item to disable/enable the interface.
We recommend that you finish skimming this document and the overview document so that you'll get a firm understanding of the basics of Indigo. However, if you want to jump ahead, you can go directly to the document that discusses how to create and manage your Z-Wave network.
Adding a Z-Wave Device
Indigo supports a variety of Z-Wave devices.
Before proceeding, make sure that you have connected and enabled your Z-Wave interface.
To add a Z-Wave device to Indigo, follow these steps:
- Select
DEVICESin the Main Window outline view or select one of the sub-folders. - Click the
New…button. You'll see theCreate New Devicedialog. - Select
Z-Wavefrom the Type popup menu. - Click the
Define and Sync…button. - You'll see the
Synchronize Z-Wave Devicedialog. - Follow the directions on the dialog to complete setting up the device.
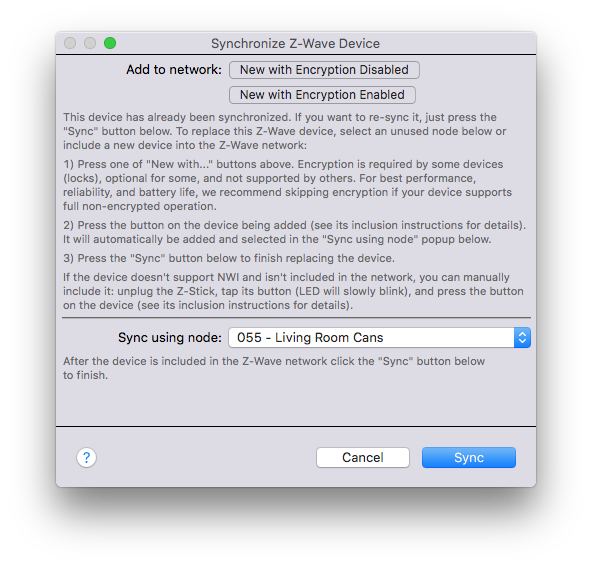
Note: all battery-powered Z-Wave devices will go to sleep to conserve battery power - when they are asleep, they will not respond to commands. Indigo needs to send the device some commands when it's adding the device, so you'll need to follow the manufacturer's instructions to wake the device up when you actually add the device to Indigo.
Using Encryption
As mentioned in the dialog, we recommend using encryption only for devices where it is beneficial or required (like locks). Although encryption increases security, it can also degrade responsiveness of the hardware and increase the potential for network congestion and retries. The additional commands required for encryption can also decrease battery life.
Changing Existing Hardware Inclusion to Use Encryption
If you added a device to the network (Z-Wave Controller) without encryption enabled and then wish to enable encryption you must first remove it from the network. This is because the encryption key exchange can only occur with Indigo if the device has just been added to the network (within a few seconds), and before a device can be added to the network it must not be included in any networks. To do this you can use the Interfaces->Z-Wave->Start Controller Exclusion Mode menu item to put the Z-Wave Controller into exclusion mode, then follow the steps from the device's manual to have it exclude itself from the network. Once excluded (you can see the progress in the Event Log window), you can then use the New with Encryption Enabled button inside the Syncrhonize Z-Wave Device dialog to re-add it to the network with encryption.
Moving a Z-Wave Lock from a Different Controller to Indigo
If you have a Z-Wave lock currently included with another controller, you must first exclude the lock from the network before adding it to Indigo with encryption enabled. To do this you can use the Interfaces->Z-Wave->Start Controller Exclusion Mode menu item to put the Z-Wave Controller into exclusion mode, then follow the steps from the device's manual to have it exclude itself from the network. Note you do not have to use the original controller to perform the exclusion – you can use Indigo's exclusion process. Once excluded (you can see the progress in the Event Log window), you can then use the New with Encryption Enabled button inside the Syncrhonize Z-Wave Device dialog to add it to Indigo's Z-Wave network with encryption. Follow the instructions from the lock's manual for the inclusion steps required. Note that either the Z-Wave Controller used by your Mac or a device that supports Z-Wave beaming will need to be within close proximity to the lock for the communication to succeed.
Editing a Z-Wave Device's Properties
Once you've defined your device, you can edit its properties. If you've still got the device dialog open, you can skip the first three steps below.
- Select
DEVICESin the Main Window outline view or select one of the sub-folders. - Find the device in the device table and double-click it (or select it an click the
Edit…button) - You'll see the standard
Edit Devicedialog - Click on the
Edit Device Settings…button and you'll see the configuration dialog:
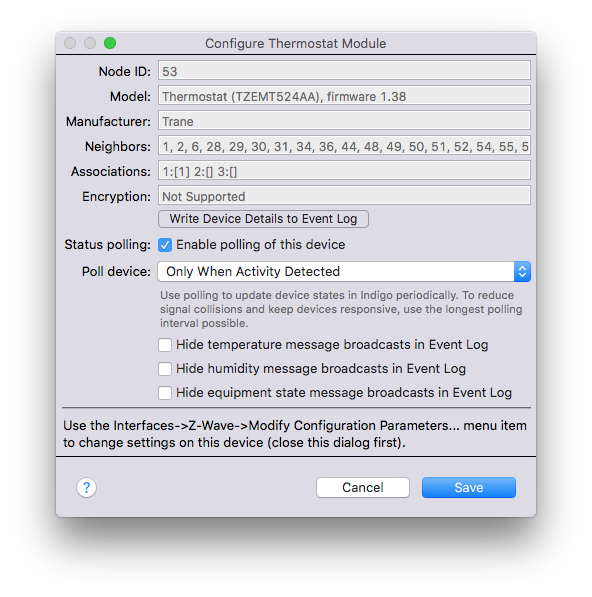
The top part of that dialog shows some details about the device that will help support when diagnosing problems.
Next, the polling properties for the device are shown if they are applicable to the device type. The first thing you need to determine is if the device needs to be polled to check for status changes. Most devices will require some kind of polling to stay in sync. There are a few devices that Indigo can determine status changes on automatically, and we'll turn off the checkbox for those when we define the device. There are many devices that don't send out this information though (primarily because of some patents held by Lutron) so we give the option to poll the device.
Next, select the desired polling interval. This setting is quite important actually - the more frequently you poll a device the more congested your network will become. In fact, we can't guarantee an exact polling frequency below 5 minutes because we have to watch for the network to become idle before we can try polling. So, we suggest that the less important devices to keep in sync are polled at longer intervals and more critical devices get polled immediately. You can also poll devices that can't or don't get manually operated at a much lower frequency because Indigo will update the state as soon as the command to operate the device is acknowledged.
The top item on the list, Only When Activity Detected, is a great optimization - some devices send out a message whenever they change - they don't actually send the necessary information for Indigo to automatically update state, but it is enough to bump the device to the top of the poll list so that the status update will occur much more quickly. And it keeps us from having to poll the device at regular intervals because we can just poll it when we see this specific message. How do you know to select this option? You can try the setting out: just select Only When Activity Detected and save the device. Then, go manually operate the device. If the status updates (within about 10 seconds) then you can leave it. If the status never updates then you'll need to pick one of the other intervals as described above.
The fastest polling option is As Often as Possible - we'll poll the device as frequently as we can given the conditions of the z-wave network.
Also shown in the settings dialog are any configuration parameters specific to that device (in this example the temperature units and display contrast). Indigo only shows settings if there is a custom device profile for a particular device. However, if no settings are shown you can still modify any configuration parameters by using the Interfaces->Z-Wave->Modify Configuration Parameter... menu item.
If a Submit Device Information button is visible, then you can use it to help us learn more about the device. When pressed a page will open in your browser asking for some more information that will help us and other users more effectively use the device. Please take time to accurately fill out the form as much as possible. The more information we have the more likely we will be able to add a custom device profile to fully support the device.
Maintaining our Z-Wave Supported Device List is a community effort since we can't possibly directly test every Z-Wave device available worldwide. We appreciate your help!
Resyncing and Replacing a Z-Wave Device
Sometimes you may be instructed by support to resync your device - the process is quite simple:
- Select
DEVICESin the Main Window outline view or select one of the sub-folders. - Find the device in the device table and double click it (or select it and click the
Edit…button). - Click the
Define and Sync…button. - Click on the
Syncbutton. - When the
Synchronize Z-Wave Devicedialog disappears, just close theEdit Devicedialog.
This will tell Indigo to query the device and update various information about it and may help with some communication issues.
If a Z-Wave device fails (and depending on the type), you may be able to just replace it with a new one and all Triggers, Conditions, Actions, and Control Pages will continue to work. To replace a device:
- Select
DEVICESin the Main Window outline view or select one of the sub-folders. - Find the device in the device table and double click it (or select it and click the
Edit…button). - Click the
Define and Sync…button. - Follow the instructions on the dialog to use your interface to include the device into your network if you haven't already.
- Select the new device in the
Sync using nodepopup - Click on the “Sync” button.
- When the
Synchronize Z-Wave Devicedialog disappears, just close theEdit Devicedialog.
Note that not all devices can be replaced. Specifically, if a device has multiple personalities (like, for instance, a multi-sensor that has a motion sensor, temp sensor, humidity sensor, etc) and any of those dependent devices are used in Triggers, Conditions, Actions, or Control Pages, then you'll get an error message in the Event Log window saying that you need to manually resolve those conflicts (or manually delete the device). Indigo helps with this process - see Deletion Dependencies for details.
Deleting a Z-Wave Device
When deleting a Z-Wave device, it's always a good idea to exclude it from your network after you've deleted it in Indigo (if it's still functional). So, the process is this:
- Select
DEVICESin the Main Window outline view or select one of the sub-folders. - Find the device in the device table and select it.
- Click the
Delete…button (or press the Delete key on the keyboard).
If the device has any deletion dependencies, Indigo will show the dependency dialog that will allow you to review and/or modify any of those dependencies. If you choose to continue the deletion process, the device will be deleted along with the dependencies.
The last thing you'll want to do is to exclude the device from your network if it's still functional. To do this you can use the Interfaces->Z-Wave->Start Controller Exclusion Mode menu item to put the Z-Wave Controller into exclusion mode, then follow the steps from the device's manual to have it exclude itself from the network.
Replacing a Z-Wave Controller
You may need to replace your controller. This section describes the steps involved in moving your Z-Wave devices to a new controller.
If your controller doesn't have a physical inclusion button you must follow this process. You may also use this process even if your controller does have a button (such as the Aeotec Z-Stick) as its the more “universal” approach:
- Remove your old controller from your Mac.
- Plug your new controller into your Mac and reconfigure the Indigo Z-Wave Interface to use the new serial port.
- Select the
Interfaces→Start Controller Exclusion Mode. Note you can exclude from any controller, not just the one it was included with. - Go to the Z-Wave device closest to your Mac that’s not battery powered (also skip any that require encryption) and perform its exclusion process.
- Go back to your Mac, edit the device you just excluded, click the
Define and Syncbutton and press theNew with Encryption Disabled(only select Enabled if you're including a device which requires encryption to work correctly, such as a lock). - Go back to your device and perform its inclusion process (press its LINK button, etc.).
- Return to your Mac (it should say
Inclusion into network successfulin green just under theAdd to networkbuttons), confirm that the new node shows up in the popup at the bottom, and then pressSync. - Repeat steps 3-7 for each non-battery powered device from the closest to your Mac to the furthest.
- Repeat steps 3-7 for each battery powered device or devices that require encryption.
- Finally, select the
Interfaces→Z-Wave→Optimize Z-Wave Network…menu item and clickStart Optimization- you can do this at night just before going to bed when the network is likely to be the least busy.
If your controller has a physical button, you may chose to follow this process because it requires fewer walks from your Mac to the devices being moved to the new controller:
- Remove your old Z-Stick from your Mac.
- Plug your new Z-Stick into your Mac and reconfigure the Indigo Z-Wave Interface to use the new serial port.
- Unplug your new Z-Stick from the Mac and take it to the Z-Wave device closest to your Mac that’s not battery powered (also skip any that require encryption) and exclude it. Note you can exclude from any controller, not just the one it was included with.
- While at the device, include it into the new Z-Stick.
- Plug the new Z-Stick back in to your Mac.
- Open the config dialog for the device you included and click the
Define and Syncbutton. - Select the new node number from the popup at the bottom and
Sync. - Repeat steps 3-7 for each non-battery powered device from the closest to your Mac to the furthest.
- Repeat steps 3-7 for each battery powered device or devices that require encryption.
- Finally, select the
Interfaces→Z-Wave→Optimize Z-Wave Network…menu item and clickStart Optimization- you can do this at night just before going to bed when the network is likely to be the least busy.
Z-Wave Menu Options
The Interfaces→Z-Wave submenu contains several Z-Wave specific menu items to help manage your Z-Wave network and devices. Below are the current options.
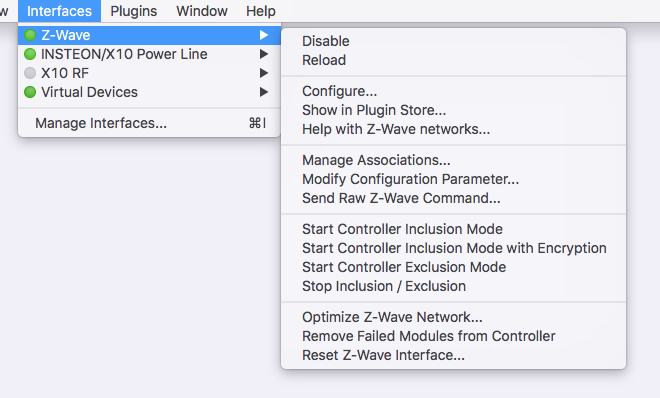
Manage Associations
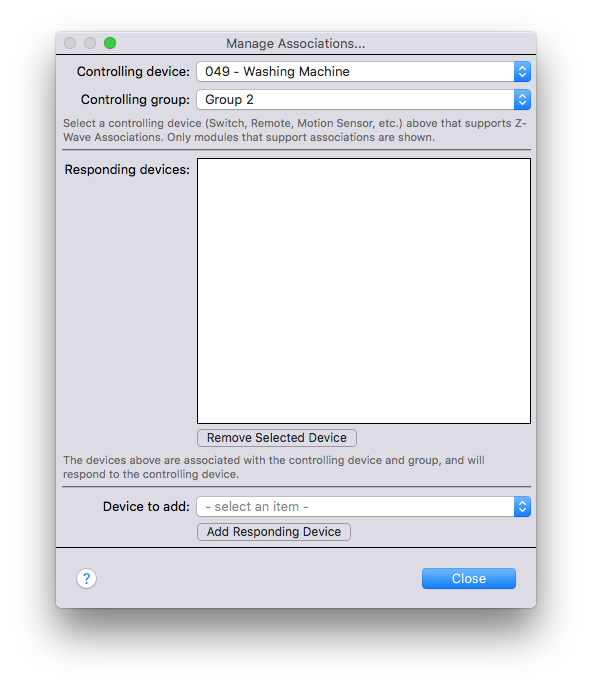
Indigo supports defining Z-Wave Associations (which are similar to INSTEON links) between devices that support that functionality. Note that battery operated devices which are asleep will need to be woken up (per their instructions manual) for associations to be edited.
Modify Configuration Parameter
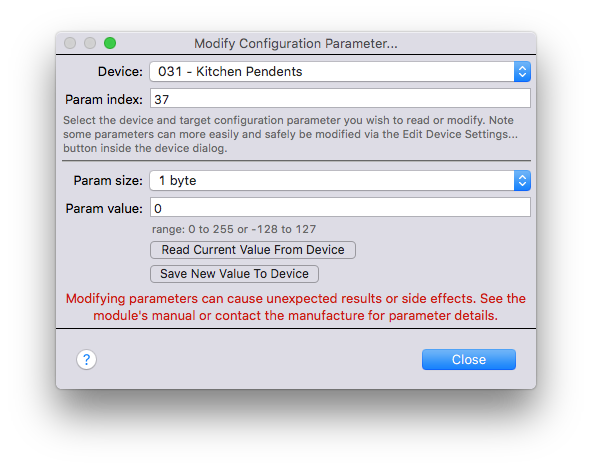
Some Z-Wave devices provide configuration options through the use of configuration parameters. These are generally outlined in the documentation that comes with a device. Indigo often times support setting these parameters directly in the device config dialog, but because of the sheer number of Z-Wave devices we can't add every one. This menu item will allow you to set any config parameter that a device accepts.
Note - this process can cause your device to not function correctly if incorrect parameters are entered so you'll want to make sure you are very careful to use only the params specified for the specific device.
Send Raw Z-Wave Command
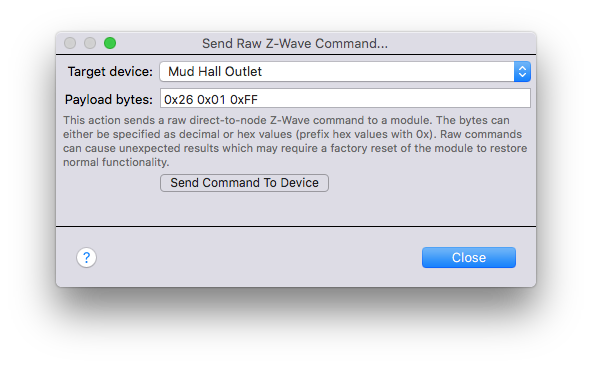
This menu selection can be used to send arbitrary Z-Wave protocol-level commands to any Z-Wave device. This is generally only useful when Support instructs you to do so. Note battery operated devices allow for the option to queue the command to be sent the next time the device wakes.
Start Controller Inclusion Mode
This menu selection puts the Z-Wave Controller into inclusion mode. You can then follow the steps from the device's manual to have it include itself from the network. Open and watch the Event Log window for progress as it is included. This menu item is functionality the same as using the New with Encryption Disabled button inside the Synchronize Z-Wave Device dialog.
Start Controller Inclusion Mode with Encryption
This menu selection puts the Z-Wave Controller into inclusion mode with encryption enabled. You can then follow the steps from the device's manual to have it include itself from the network. Open and watch the Event Log window for progress as it is included. This menu item is functionality the same as using the New with Encryption Enabled button inside the Synchronize Z-Wave Device dialog.
Start Controller Exclusion Mode
This menu selection puts the Z-Wave Controller into exclusion mode. You can then follow the steps from the device's manual to have it exclude itself from the network. Open and watch the Event Log window for progress as it is excluded. Note Indigo is able to exclude device s from any Z-Wave network.
Stop Inclusion / Exclusion
This menu selection exits both inclusion and exclusion mode.
Optimize Z-Wave Network
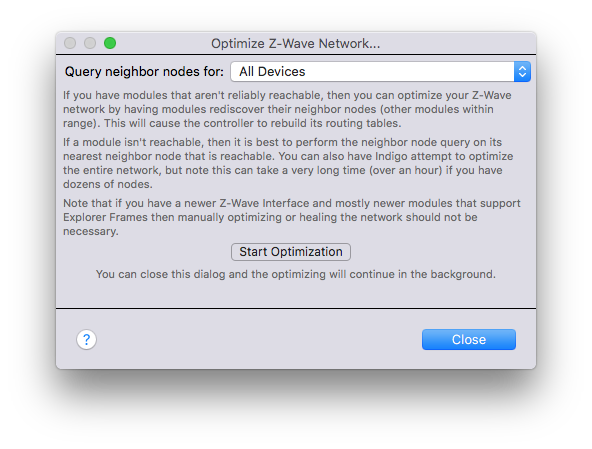
Indigo can optimize your Z-Wave network by having devices rediscover which devices they are close enough to communicate with. This information is then reported back to the Z-Wave Controller so network routing tables can be updated.
Remove Failed Device from Controller
If a Z-Wave device is no longer available to your network (it failed, etc) then you can use this menu item to remove it from the interface. You might need to attempt a Define and Sync on the device (and allow it to fail) - just create a new device, try to sync it, when it fails then try to remove it.
Reset Z-Wave Interface
You can completely reset your Z-Wave interface by selecting this menu item. You should only do this if instructed by Support.
Z-Wave® is a registered trademark of Sigma Designs, Inc. Indigo's support of Z-Wave hardware is neither endorsed nor certified by Sigma Designs.
