Table of Contents
EasyDAQ Relay Card Plugin
The EasyDAQ Relay Card Plugin for Indigo integrates several USB (and IP) controlled relay and digital input/output cards with Indigo. Using Indigo you can control the digital and relay output channels, execute actions when a digital input changes, and inspect all input and output channels remotely via Control Pages.
Cards Supported
Several versions of the EasyDAQ cards are supported:
- USB4PRMxN, USB4PRMx, USB4SRMx (4 relays + 4 DIO channels)
- USB8VI4DIOSR (8 isolated inputs + 4 relays + 4 DIO channels)
- USB8PR2, USB8PR, USB8SR (8 relays)
- USB16PRMxN, NET16PRMx (8 relays + 8 relays/DIO + 8 DIO channels)
- USB24MxS (24 relays)
- USBDIO24 (24 DIO channels)
Adding Cards to Indigo
Each USB controlled card is added to Indigo as a separate Indigo Device. All EasyDAQ relay cards use the FTDI VCP driver, so be sure and download and install it first.
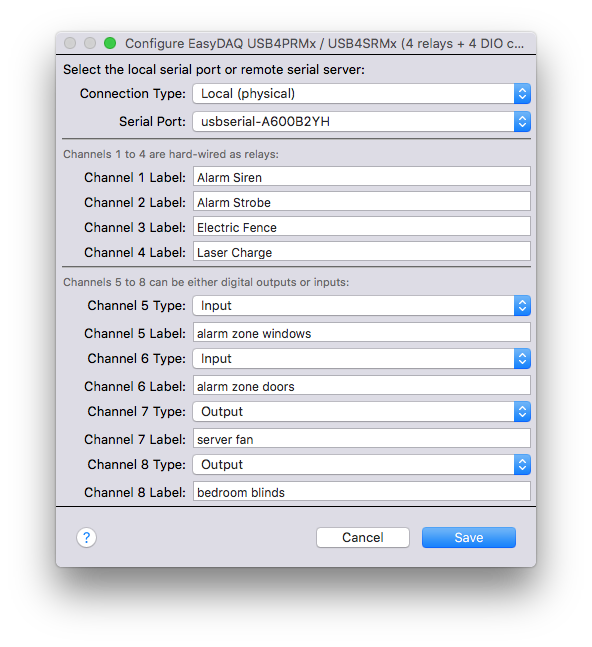
Next choose the File→New Device… menu item, select Plugin from the Type popup control, and EasyDAQ Relay Card from the Plugin popup control, and choose the correct Model. Press the Edit Device Settings… button to configure the card:

The FTDI VCP driver adds the virtual serial port. Note you must have the card plugged into your Mac for the port to be shown in the popup control. Or if you are using a network (IP) based card, you can select the Network Socket connection type and enter the IP and port address for the card. You can define custom labels for all of the inputs and outputs, and for some channels, depending on the card model, choose if a digital input/output is being used as an input or an output.
Controlling Relay and Digital Outputs
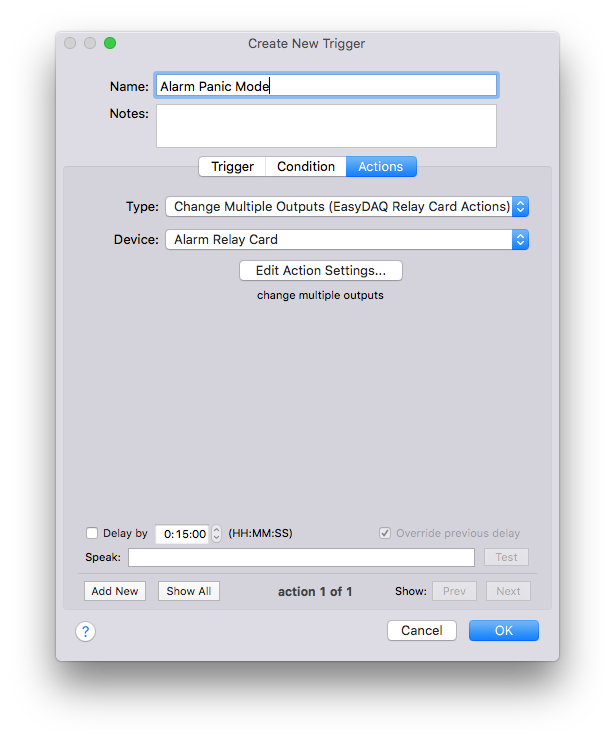
The output channels are controlled via Indigo actions. The actions can be inside Triggers, Schedules, Action Groups, or assigned to Control Page controls. From the Action panel inside these dialogs choose Plugin from the Type popup control, and then choose the Action you want to perform and the target Device:

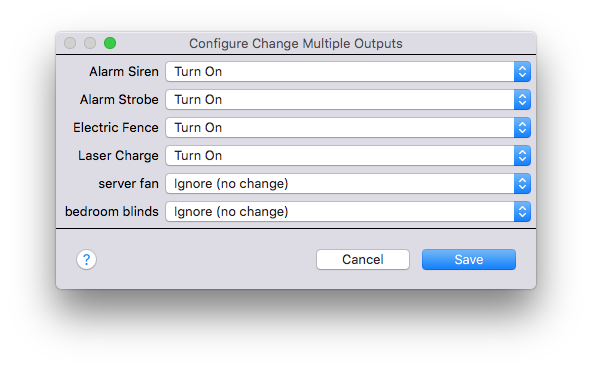
Some actions have additional options available via the Edit… button. For example, the Change Multiple Outputs action allows you to control (turn on, turn off, or toggle) all of the outputs with a single, and very fast, action:

Triggering Actions on a Digital Input Change
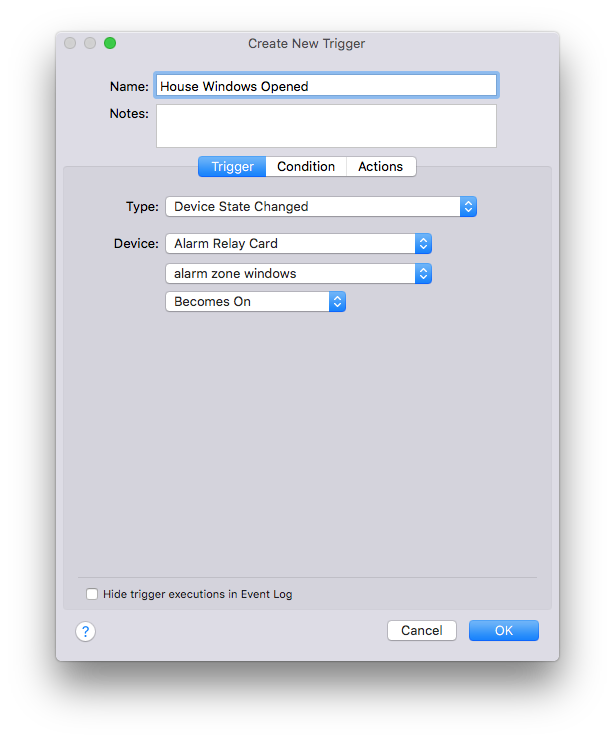
Indigo will automatically track all input and output channel states. To trigger an action when a particular channel state changes from OFF to ON (or ON to OFF) choose the File→New Trigger menu item, and select Device State Changed from the Type popup control. Next, select the Indigo device representing the EasyDAQ card you want to monitor, and then choose which channel change will cause the trigger:

You can then use the Condition panel to add further logic, and the Actions panel to define the action you want executed (ex: turn on lights, send an email, etc.)
Preventing Floating Input Problems
Depending on the EasyDAQ model you are using, you may experience a floating input problem when an input is left in an open state. If you see a continuous stream of changes logged inside Indigo only when an input is in an open state, then you will need to use a pull-up (or down) resistor.
Scripting Support
As with all plugins, actions defined by this plugin may be executed by Python scripts. Here's the information you need to script the actions in this plugin.
Plugin ID: com.perceptiveautomation.indigoplugin.easydaq-usb-relay-cards
Action specific properties
Turn On Output
Action id: turnOnOutput
Properties for scripting:
channelSel | this is the channel number to turn on, values depend on the type of card you have |
Example:
easyDaqPlugin = indigo.server.getPlugin("com.perceptiveautomation.indigoplugin.easydaq-usb-relay-cards")
if easyDaqPlugin.isEnabled():
	easyDaqPlugin.executeAction("turnOnOutput", deviceId=131523919, props={'channelSel':1})
Turn Off Output
Action id: turnOffOutput
Properties for scripting:
channelSel | this is the channel number to turn off, values depend on the type of card you have |
Example:
easyDaqPlugin = indigo.server.getPlugin("com.perceptiveautomation.indigoplugin.easydaq-usb-relay-cards")
if easyDaqPlugin.isEnabled():
	easyDaqPlugin.executeAction("turnOffOutput", deviceId=131523919, props={'channelSel':1})
Toggle Output
Action id: toggleOutput
Properties for scripting:
channelSel | this is the channel number to toggle, values depend on the type of card you have |
Example:
easyDaqPlugin = indigo.server.getPlugin("com.perceptiveautomation.indigoplugin.easydaq-usb-relay-cards")
if easyDaqPlugin.isEnabled():
	easyDaqPlugin.executeAction("toggle", deviceId=131523919, props={'channelSel':1})
All Outputs On
Action id: allOutputsOn
No properties for scripting are required.
Example:
easyDaqPlugin = indigo.server.getPlugin("com.perceptiveautomation.indigoplugin.easydaq-usb-relay-cards")
if easyDaqPlugin.isEnabled():
	easyDaqPlugin.executeAction("allOutputsOn" deviceId=131523919)
All Outputs Off
Action id: allOutputsOff
No properties for scripting are required.
Example:
easyDaqPlugin = indigo.server.getPlugin("com.perceptiveautomation.indigoplugin.easydaq-usb-relay-cards")
if easyDaqPlugin.isEnabled():
	easyDaqPlugin.executeAction("allOutputsOff" deviceId=131523919)
Change Multiple Outputs
Action id: changeMultiple
Properties for scripting:
channelSel# | this is the command for the channel and must be one of the following: “turnOn”, “turnOff”, “toggle” - note that you should have separate properties for each channel, see example below for details |
Example:
easyDaqPlugin = indigo.server.getPlugin("com.perceptiveautomation.indigoplugin.easydaq-usb-relay-cards")
if easyDaqPlugin.isEnabled():
	easyDaqPlugin.executeAction("changeMultiple", deviceId=131523919, props={'channelSel1':'turnOn', 'channelSel8':'toggle', 'channelSel17':'turnOff'})
Support and Troubleshooting
For usage or troubleshooting tips discuss this device on our forum.

