Table of Contents
Using Apple Shortcuts with Indigo
Apple's Shortcuts app* allows you to create custom workflows on macOS, iOS and iPadOS (you can't currently run shortcuts on tvOS). You can also use Apple Shortcuts with Indigo to call many functions and use Indigo events to fire Apple shortcuts. Using Indigo's HTTP API with Apple's Shortcuts app is easy and there are different methods to accomplish this (this document uses Indigo's v2 API which shipped with Indigo v2022.2).
If you'd like to ask questions or share your Shortcuts success stories with others, use the Apple Shortcuts Forum
* The shortcuts app for macOS is only available for Monterey (12.x) and newer versions. It has been available for iOS and iPadOS since version 12.
Obtaining an API Key
In order to use authorization keys as used in the following examples, you'll need an active Indigo Up-To-Date subscription and an activated reflector.
- Log into your Indigo account's Authorizations Page.
- Go to
Add an API Key. - Select the Server that you want to use to accept the key.
- Click on the
Add API Keybutton.
Building Your First Shortcut
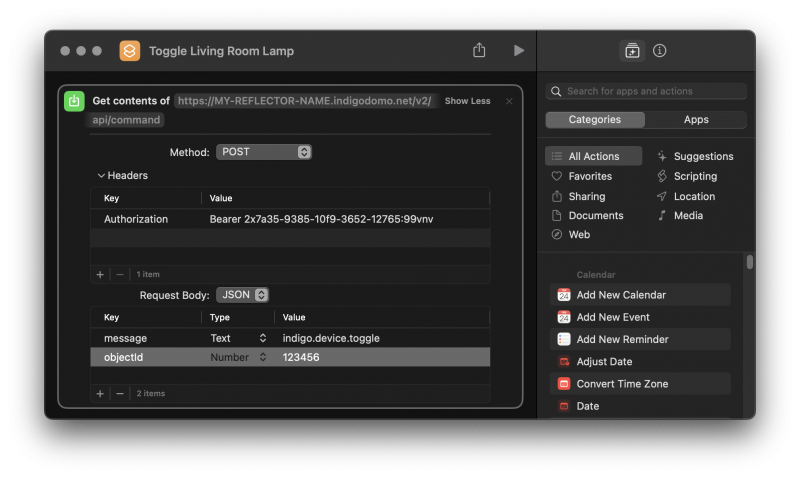
Building your shortcut in the Shortcuts app is largely the same whether you do it on macOS or iOS, and – depending on the type of activity you want to initiate – only takes a couple of steps. The information you'll need depends on what you want to do, but all the API events are constructed in the same way. For this example, we'll use the macOS Shortcuts App to build our shortcut (you can also do it on iOS and iPadOS). At first, this looks like a lot of steps, but there's actually only a few pieces of information required. All values below are entered without quotes. For our first example, we'll perform a simple Indigo Device Toggle.
You'll need:
- The base URL:
https://MY-REFLECTOR-NAME.indigodomo.net/v2/api/command/(replaceMY-REFLECTOR-NAMEwith the name of your active reflector, - Your authentication key:
c2xr7q35-9385-10f9-3652-12z765j99vnv(replace with your valid key. This one is fake.), - The command you want to execute – such as:
indigo.device.toggle, - The Indigo ID of the device (or action, or variable, etc.) you want the command to apply to:
123456, and - Any parameters you want to include (some are optional, some are required.)
The Steps
- New shortcut (
+at the top) - In the search box on the right side, type “Get Contents of URL”.
- Drag (or double-click) the action to add it to the editor.
- Click on the
URLfield and enter the base URL above. If using an external IP address or reflector make sure to usehttps:and not justhttp:. - Click on “Show More”.
- Select Method:
Post. - Expand the Headers section by clicking on the
>. - Within the Headers section, click the
+. - Under Key:
Authorization. - Under Value:
Bearer 2x7a35-9385-10f9-3652-12765:99vnv. (The wordBearer, one space and then your API key.) - Make sure that
Request Bodyis set toJSON. - Within the Request Body section, click the
+. - Under Key:
message(make sure theTypeis set toText. - Under Value:
indigo.device.toggle. - Within the Request Body section, click the
+. - Under Key:
objectId. - Under Value:
123456(your device ID, make sure theTypeis set toNumber.)
At the top of the Shortcut editor window, you can change “Get Contents of URL” to something descriptive like “Toggle Living Room Lamp”. Likewise, you can click on the icon to customize it to your taste. Finally, if you'd like, you can add the Shortcut to your dock (or home screen on iOS), a shortcuts widget, or simply fire them from within the shortcuts app.
Once you've built and tested your first Shortcut, it's easy to duplicate and edit additional shortcuts. All HTTP API commands should work in a similar way.
Optional Parameters
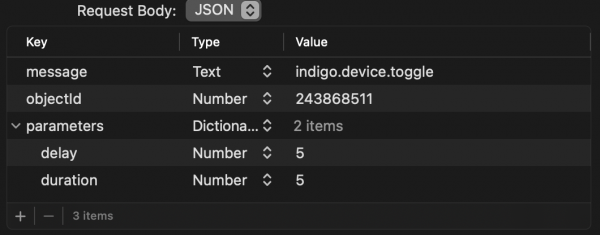
In order to add parameters to the command (for those calls that take parameters – not all commands do), you include those as a dictionary attached to the command payload like this:
NOTE: “optional” here refers to our toggle device example. For other API commands, parameters may be required.
Of course, you can add additional Shortcuts Apps and Actions to the workflow as needed.
Action Group Shortcuts
There is currently only one API command for Action Groups – indigo.actionGroup.execute – which requires two payload elements:
- The command:
indigo.actionGroup.execute(Text) - The Action ID: 123456 (Number)
Variable Shortcuts
Get a Variable Value
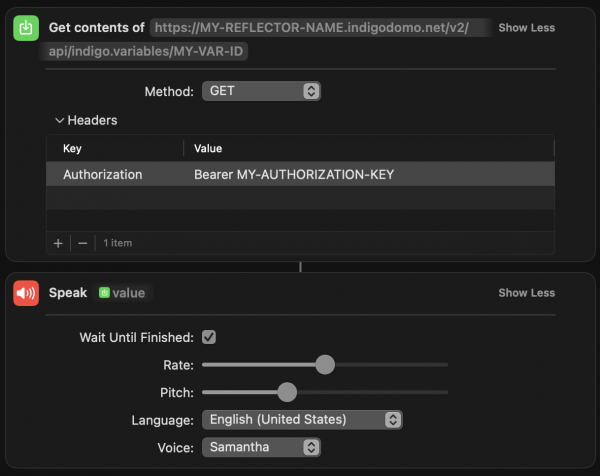
This example shows how to obtain a variable's value and do something with it – in this case, speak the value aloud. The action you take in your shortcut could be any number of things.
- You can get an individual variable object by referencing its Indigo ID directly
https://MY-REFLECTOR-NAME.indigodomo.net/v2/api/indigo.variables/MY-VAR-IDwhere you replaceMY-REFLECTOR-NAMEwith your active reflector name andMY-VAR-IDwith your variable's ID.
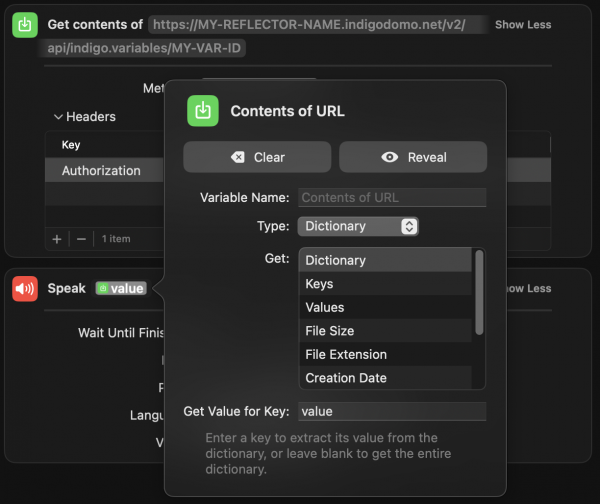
- The “trick” to getting the variable's value into the
speakaction is to tell your shortcut what kind of data it is. To do this, click onGet Contents of URLin the speak action, set the data type toDictionary, and setGet Value for Keytovalue(be sure to hit return or tab to get the settingvalueto stick.)
Update a Variable Value
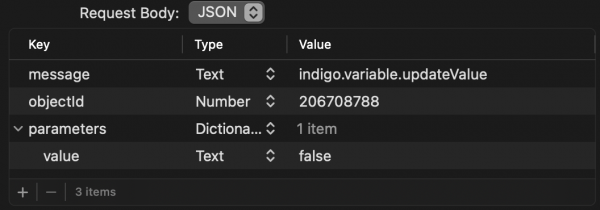
There is currently only one API command for Variables – indigo.variable.updateValue – which requires three payload elements:
- The command:
indigo.variable.updateValue(Text) - The Action ID: 123456 (Number)
- A parameters dictionary that has one key/value pair (required):
key: value,- the new variable value which must be set to Text because all Indigo variable values are stored as text.
Variable Value as a Conditional
You can include conditions in your shortcuts and take action – or not – based on the condition. For example, turn on a light – but only if it's dark outside.
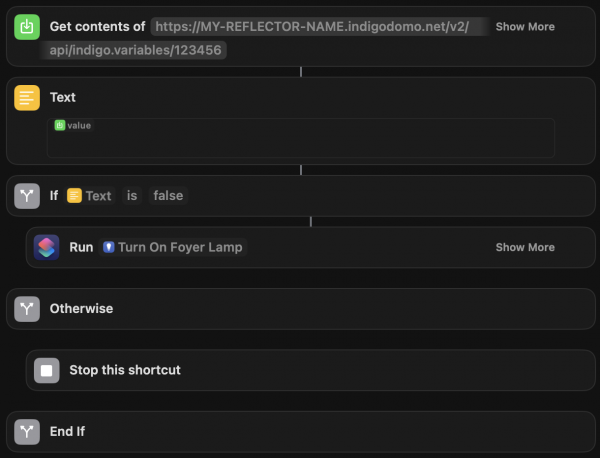
- As with the other examples, set up your
Get Contents of URLaction to get a variable's value – in this example, the built-in variableisDaylight, - Take the returned dictionary and extract the value of the
isDaylightvariable in aTextaction, - Add an
Ifcondition and, if the Text value is equal tofalse(Indigo variable values are always strings/text) then run your next shortcut action. Alternatively, you could send another command directly to the Indigo server (which is essentially what your linked shortcut is doing). - If the Text value is not
false, theOtherwiseaction will be executed.
Using Your Shortcuts
How you use your shortcuts is a matter of taste – and you can always run them from the shortcuts app – but here are a few other suggestions to get you started:
- Save shortcuts to your Home Screen in iOS (using the Share menu),
- Using a Shortcuts Widget,
- Create a folder of your shortcuts on iOS to mimic a widget,
- Add shortcuts to the Dock in macOS (File menu),
- Using Siri: “Hey Siri – Living Room Lamp” (name of the shortcut).
Location Based Shortcuts
You can run location-based shortcuts too, but they require “additional” steps and at least part of the automation must be built on an iPhone or iPad. There are several options to choose from, including:
- Time of Day,
- Alarm,
- Sleep,
- Arrive,
- Leave,
- Before I Commute, and
- and many others.
Location-based shortcuts are not currently available in macOS (so you'll need to set up the location control piece on iPhone or iPad). The Leave and Arrive shortcuts cannot be run automatically. They require confirmation each time they are run. There is currently no way to turn this requirement off.
Using the Indigo Reflector service is recommended (the URL you use for a location-based shortcut can't be one that only works on your local network.)
- Review your automation.
- Create the shortcut using the steps outlined above using macOS or iOS. For example, you could update a variable value set to
HomeorAway. - In the Shortcuts app for iOS (or iPadOS), select
Automationsfrom the tab at the bottom. - Click the
+at the top. - Choose “Create Personal Automation”.
- Choose
ArriveorLeave. - On the Location setting, select
Choose. - Select “Current Location” or whatever location you choose, then select
Done. You can also adjust the range of the trigger in the bottom map panel (the minimum range is about 100 meters or 328 feet). - Select
Next. - Search for and select “Run Shortcut”.
- Next to “Run”, tap the word
Shortcutand select the shortcut you created in step 1. Add any next actions as needed (not covered in this example). - Select
Done
Now, your iPhone (or iPad) should run your shortcut when you Arrive/Leave that location.
If you don't like the requirement to confirm the shortcut each time, there are other apps that allow for URL calls to be fired based on location.
Firing Shortcuts From Indigo
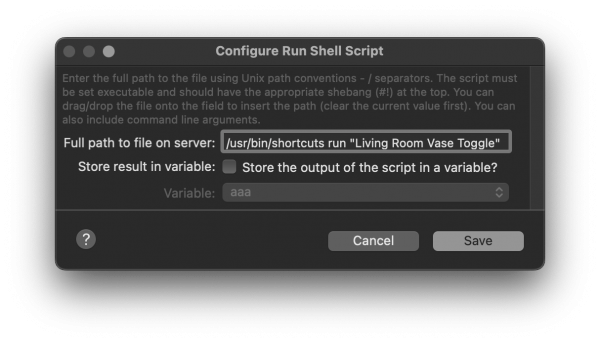
Using shortcuts to make Indigo do something is an awesome feature. But you can also use Indigo to run your shortcuts as well. Running a shortcut from Indigo is easy. The easiest way is to run the shortcut from the command line. When calling a shortcut from the “Run Shell Script” action, it's best to use the full path to the target: /usr/bin/shortcuts to make sure Indigo can find it.
This specific approach requires the shortcut to be accessible by the Indigo server machine. If you don't have access to your shortcuts on the server, there are other ways to do this such as using Indigo to send a text message and linking the shortcut to Messages. Note that the Run Shell Script action doesn't support pipes, so if you want to send data to the shortcut, read on.
Run Shell Script Action
Sometimes, you may want to pass information to your shortcut from Indigo. For example, you can have Indigo fire a Notification on the server machine that includes real-time information. In this example, Indigo is asking the shortcut to run, and then the shortcut requests the pertinent data through the HTTP API.
- Run the shortcut using a Run Shell Script Action.
- Configure the shortcut to request the text value from Indigo using the appropriate API method outlined above.
Run Python Script Action
If you'd like to avoid the round trip of the example above, you can pass data directly to a shortcut using a simple Python script. In this example, we'll use Indigo's built-in Run Embedded Script action (the script should take less than 10 seconds to complete; otherwise, use a linked script to avoid the time limitation). The following example is the bare minimum required to use this approach.
os.system()
import os

val = indigo.variables[123456].value  # The value to pass. In this case, a variable value.
os.system(f'/usr/bin/shortcuts run "Post Event to Calendar" <<< \"{val}\"')  # Will return 0 on success; 256 on error.
Note the escaped double-quotes for the shortcut payload. These are important to ensure that payloads with embedded spaces are sent as an encapsulated string object. For more information on the os.system() Python command, take a look at the official docs.
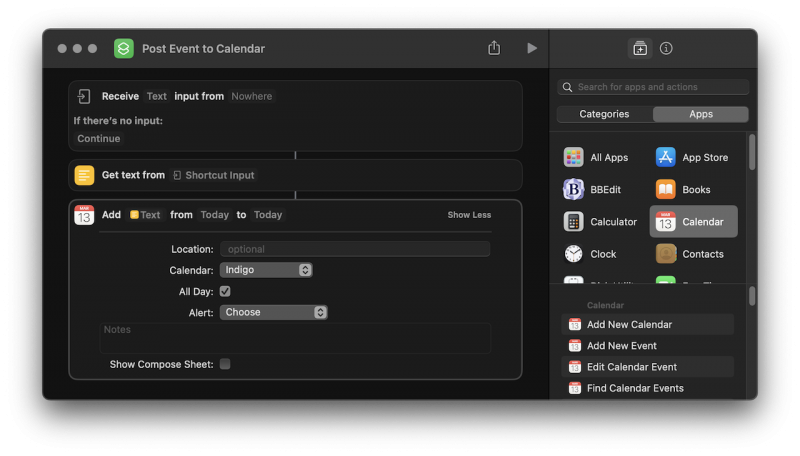
Apple Shortcut
- Get Text From - Shortcut Input
- Calendar - Add New Event
subprocess.run()
When using the os.system() command, the function returns a 16-bit value (0 on success / 256 on error) to let you know if the command was successful. If you'd like to get a value back to Indigo after running the shortcut, one way is to use the more robust subprocess.run() function. This function supports a bytes object return for more elaborate scripting capabilities. Here is an example of a call using the subprocess.run() function:
import subprocess
result = subprocess.run(['/usr/bin/shortcuts', 'run', 'My Shortcut'], input=b"Input Text", check=True, capture_output=True).stdout  # 'result' is a bytes object.
Notice that the input is also a bytes object and will need to be decoded to use it. With this command, the shortcut will receive b“Input Text” as input, and anything returned by the shortcut will be stored in the result variable. If the call is unsuccessful, subprocess will throw the relevant error trace.
This type of call would be useful for things like getting a list of upcoming appointments or reminders. For example, you could send the number of appointments you want in the subprocess call and get the appointment details back in the result.
External Shell Scripts
You can also accomplish the same result using a shell script.
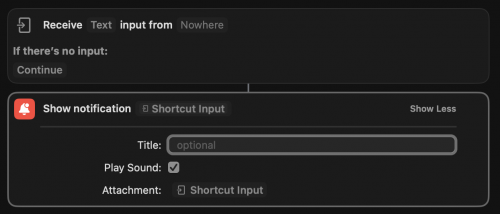
- Create your Notification shortcut named “Test Alert”:
- Create a new shortcut and add the “Show Notification” action.
- For
Attachment, select “Shortcut Input”. - Double-click “Shortcut Input” and select Type:
Text
It should look something like this:
Using a plain text editor, create a new file called script1.sh (or whatever), enter the following text, and save it.
#!/bin/bash

# Note that redirects such as `pipe` aren't supported in the Indigo Run Shell
# Script dialog and will require a script file method.

echo "$1" | /usr/bin/shortcuts run "Test Alert"
We need to make our script executable, so in Terminal, head to the folder where your script is saved and type:
chmod +x script1.sh and hit return. Now we can run our shell script from Indigo.
- Under Actions, create a new Action (or add a new Action to an existing Action Group.
- Select Type:
Run Shell Script. - Select
Edit Action Settings. - Enter the full path to your script and the custom message you want to send:
/Users/username/Temp/script1.sh “Hello world.”replacing/Users/username/Temp/with the path to your script. - If you like, you can elect to have the result saved to an Indigo Variable (optional).
- Select
Save, and thenOK.
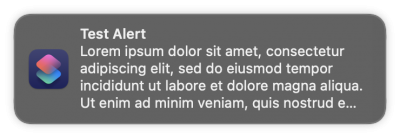
From within Indigo, execute your action. The custom message you sent (in this example, “Hello world.”) will be sent to the script and will appear in the resulting notification.
You probably want to send something more interesting than Hello world., for example the value of some variable. We can do this using Indigo's substitutions feature.
/Users/username/Temp/script1.sh "%%v:568909175%%"
Notice the quotes around the substitution. If you don't enclose the substitution in quotes, you'll get the variable text value only up to the first space. Quotes will ensure the whole value is sent.
The opportunities here are only limited by the boundaries of the Shortcuts app. For example, you could add the value of a variable to your Calendar or send the value to a text message.
Firing Your Shortcuts with Siri
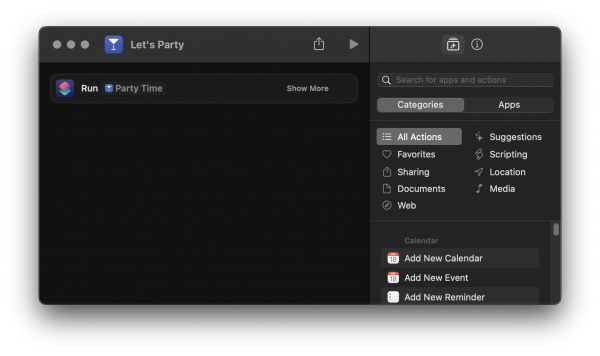
Of course, you can have Siri run your shortcut by saying the name of the shortcut you want to run. To run the Toggle Living Room Lamp shortcut, say, “Hey Siri. Toggle Living Room Lamp”. However, once you begin to have a lot of shortcuts, it can be tough to remember the exact name of every shortcut in your collection. One thing that can help is to create multiple shortcuts with similar names that all point to the same “original” shortcut. That way, if you make a change to the original shortcut, you don't need to change the others (if you change the name of the original shortcut, the Shortcuts app will update the others).
| Siri Phrase | Action taken |
| “Party Time” | sets lights, temperature, tv, whatever |
| “Let's Party” | Runs Party Time shortcut |
| “It's Party Time” | Runs Party Time shortcut |
| “I'm Having a Party” | Runs Party Time shortcut |
Ideas
Calendar
- Create a separate calendar called “Indigo Events” to track events over time.
- Add weather information to your Calendar.
Clock
- Create an alarm on your phone.
Home
- Use Indigo to trigger events with your HomeKit devices.
- Use HomeKit to trigger events with your Indigo server.
Messages
- Send messages with important information about your Indigo server.
- Trigger your Indigo server by texting a phrase.
Tips
These tips can help make using shortcuts to control Indigo easier:
- If you save your shortcuts to the Home Screen in iOS, be sure you're happy with the look of the icons before you add a bunch of them. Changes you make to the icons later in the Shortcuts app won't update home screen bookmarks automatically (they will change automatically in widgets).
- Put your most commonly used shortcuts first because widgets only display a few at a time.
- You can create shortcuts in the iOS app, but it is much easier to create them in macOS.
- With location-based automations, some (but not all) notifications can be silenced. When available, you will see a toggle for “Ask Before Running”. If you set this to
off, a new toggle will appear that says, “Notify When Run”. If this is also set tooff, then notifications for this automation will not be sent. Presently, there is no global setting to turn off all automation notifications. - Create folders in the shortcuts app that mimic the folders in Indigo. If you find that you can't drag a shortcut to a new folder, it may help to create a “dummy” shortcut into the folder first.
- If using a local address such as
localhost:8176or10.0.1.123:8176make sure to usehttp://and nothttps://) - To use your shortcuts with Apple Watch, edit your shortcut, click on the ⓘ icon and select “Show on Apple Watch”.
- Indigo servers running versions of macOS prior to Monterey do not have local access to the Shortcuts app.
Reference
Command Line Commands
Here are a few commands you can run from the command line with the Shortcuts App that may be useful:
| Command | Result |
shortcuts run “My Shortcut” | Run shortcut named “My Shortcut” |
shortcuts run "My Shortcut" <<< '{"message":"indigo.device.toggle", "objectId":"123456", "Arg":"Arg Value"}' | Pass a dictionary to Indigo. |
shortcuts list | List available shortcuts. |
shortcuts list –f | List available folders. |
shortcuts list -f Living\ Room | List all shortcuts in the “Living Room” folder. |
man shortcuts | List of available commands. |

