
Table of Contents
Indigo Web Server
The Indigo Server contains a fully-functioning web server that you can use to serve content locally or via the Indigo Reflector Service (the Reflector requires an active Indigo Up To Date subscription). You can use this functionality to make content available in a variety of ways. For example, Indigo users have created complex web sites using JavaScript, Vue, and Svelte. See below for a fully-functional example.
Advanced Web Server Settings
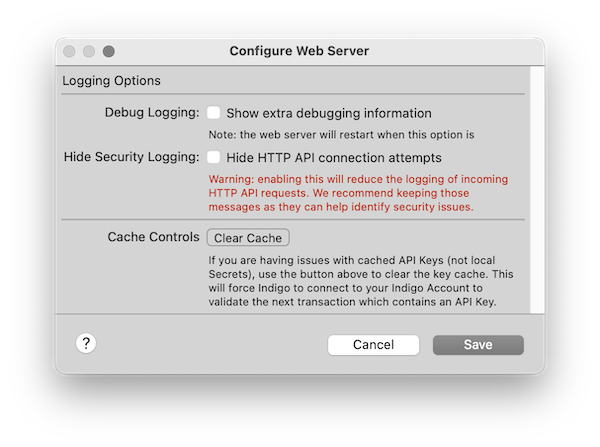
Beginning with Indigo 2023.1, an Advanced Web Server Settings… menu item was added to the Indigo menu. The menu has three options:
- Debug Logging: Enable this setting to show extra Web Server debugging information.
- Hide Security Logging: Enable this setting to hide HTTP API connection attempts. Warning: enabling this will reduce the logging of incoming HTTP API requests. We recommend keeping these messages as they can help identify security issues.
- Cache Controls: If you are having issues with cached API Keys (not Local Secrets), use the button to clear the key cache. This will force Indigo to connect to your Indigo Account to validate the next transaction which contains an API Key.
Web Assets Folder Structure
Indigo 2023.1 contains special folders that are accessible to the Indigo Web Server which are located in:
/Library/Application Support/Perceptive Automation/Indigo 2023.1/Web Assets/
There are four stock folders located under this parent folder:
/Library/Application Support/Perceptive Automation/Indigo 2023.1/Web Assets/images
/Library/Application Support/Perceptive Automation/Indigo 2023.1/Web Assets/plugins
/Library/Application Support/Perceptive Automation/Indigo 2023.1/Web Assets/public
/Library/Application Support/Perceptive Automation/Indigo 2023.1/Web Assets/static
As a convenience, you can access these folders under the Indigo Help menu: Help –> Show Web Assets Folder
All assets you want to make available to the Indigo Web Server should be stored in these folders.
images folder
This folder is used to publish files and make them available in the Indigo UI for use in control pages (and for other purposes). More information on using this folder can be found in the Custom Images on Control Pages page.
plugins folder
With Indigo 2022.2, web server plugins are no longer supported.
public folder
This directory can be used to publish files from the Indigo Web Server that will be made available to anyone without any authentication. If someone knows the URL of your reflector, they will have access to any files that are in this directory, so use it wisely.
For example:
https://MYREFLECTOR.indigodomo.net/public/about.txt
http://10.0.1.2:8176/public/about.txt
http://localhost:8176/public/about.txt
Basic MIME types will be determined from file extensions. Subdirectories are also allowed so you can create hierarchy:
https://MYREFLECTOR.indigodomo.net/public/somedirectory/somefile.html
https://MYREFLECTOR.indigodomo.net/public/images/somepic.jpg
Any files and/or directories in the /public/ folder will need to be moved over when you upgrade to a new major version (the installer WILL NOT move them automatically). The public folder was added with Indigo version 7.1.
static folder
This directory can be used to publish files from the Indigo Web Server that will be made available to anyone with authentication. If someone knows the URL of your reflector, they will have access to any files that are in this directory once they have entered the appropriate authentication credentials for your reflector.
For example:
https://MYREFLECTOR.indigodomo.net/static/about.txt
http://10.0.1.2:8176/static/about.txt
http://localhost:8176/static/about.txt
Basic MIME types will be determined from file extensions. Subdirectories are also allowed so you can create hierarchy:
https://MYREFLECTOR.indigodomo.net/static/somedirectory/somefile.html
https://MYREFLECTOR.indigodomo.net/static/images/somepic.jpg
Authentication
API Keys
Information on Indigo Authentication options using API Keys can be found on the Integration APIs page under the authentication section.
Local Secrets
In addition to authentication via API Keys and the Indigo Reflector (recommended), users can create their own local secrets (another type of key) that don't require an internet connection to validate. Users can create a JSON list of their own “secrets” that will be loaded whenever the web server is restarted. The secrets file is located in the install folder's /Preferences directory and is named secrets.json. This feature was introduced with Indigo version 2023.1:
/Library/Application Support/Perceptive Automation/Indigo 2023.1/Preferences/secrets.json
Those secrets can be used in both authorization headers and in the api-key query argument on URLs (exactly the same as API Keys). Example:
[
    "here-is-a-key",
    "this*is*another*key"
]
Additionally, if the user wants to completely disable API Keys, they may add the string “do-not-use-api-keys” to their list of secrets.
[
    "here-is-a-key",
    "this*is*another*key",
    "do-not-use-api-keys"
]
The effect here is that only the first two will successfully authenticate API calls and nothing else. If the user only specifies this:
[
    "do-not-use-api-keys"
]
The effect would be the same as unchecking the “Enable OAuth and API Key authentication” checkbox in the Start Local Server dialog, but with different logging when an authentication try fails. While valid, this configuration is not recommended; instead, users should use the OAuth setting when the server is first started (to avoid confusion).
You use the local secret(s) the same way you would use an API Key; for example,
http://localhost:8176/v2/api/indigo.devices/123456789?api-key=my-local-secret
Custom Web Page Example
Using the Indigo Web Server and Web Assets folders is extremely easy. This example is for reference purposes and is not meant to be a primer on constructing Web content. There are many good tutorials online that you can refer to if needed.
First, create your content. For example, web sites often contain a index.html page. A simple index.html page looks like this:
<!DOCTYPE html>
<html lang="en">
  <head>
    <meta charset="utf-8">
    <title>Indigo Web Server</title>
  </head>
  <body style="height:100%; width:100%">
    <div id="content" style="position:absolute; top:0px; left:0px; height:200px; right:0px;overflow:hidden;">
      Hello world.
    </div>
  </body>
</html>
Using a plain text editor, save this code as index.html within the …/Web Assets/static folder (to serve it with authentication) or within the …/Web Assets/public folder (to serve it without authentication). You can refer to assets located in other folders by referencing them with the Web Assets folder as the root.
That's it! The Indigo Web Server will serve your web page via the appropriate method.