Table of Contents
KeypadLinc Buttons
KeypadLinc buttons, and how you use them, is a pretty complex topic for a variety of reasons. One, while the buttons are directly addressable from Indigo on newer KeypadLincs, doing so is quite expensive in terms of INSTEON traffic. So if you're doing a lot of button LED manipulation it's often better to do it in a more efficient manner (explained below).
Another complexity is how to keep buttons on multiple KPLs in sync when they are representing the same state. There are a variety of ways of doing this (again, see below for another option), but you can use INSTEON links to link those buttons together so that when, say, button 4 is pressed on KPL#1, button 5 on KPL#2 lights up as well. You can link those buttons together via the KPL instructions, or you can use Indigo's remote link management feature to do the linking.
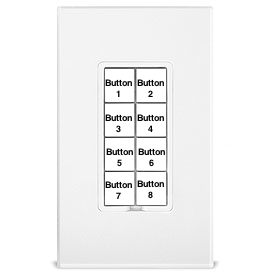
One thing to keep in mind about KPLs: they come in 6 and 8 button configurations. On an 8 button KPL, Indigo refers to the buttons like this:
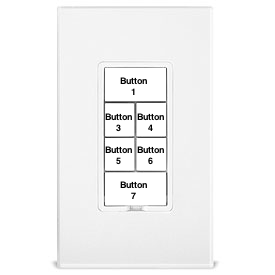
When you refer to a button on a 6 button KPL in Indigo, you refer to the buttons like this:
Note - the KPL will never send a button 2 or 8 in 6 button configuration.
There are two major tasks that you'll likely find yourself wanting to do: execute Indigo actions when a button is pressed and manage the state of a button (on/off) with Indigo.
Triggering when a KeypadLinc Button is pressed
OK, so, you just bought a KeypadLinc (KPL for short). And, you've got it wired up and controlling the load. Now, how the heck do you use those wonderful extra butons? Having Indigo execute commands when a KeypadLinc button is pressed is quite simple (for example, looking for button 3):
- Select
TRIGGERSfrom the outline view on the left - Click the
New…button - Name the trigger whatever you want
- Select
Insteon Command Receivedfrom theType:popup - Select the KeypadLinc in the popup list beside the
Deviceradio button - Select
Onfrom the popup labeledReceived: - Select
Button/Group 3 - Click the
Actionstab and add any actions you want to perform
That would execute whenever button 3 is pressed and turns ON. Create a similar trigger that fires when the button goes OFF to perform some other set of actions. If you don't want the button to toggle between ON and OFF (but rather just always perform the same action) then you can set the button's toggle mode (select Interfaces→INSTEON/X10 Power Line→Set KeypadLinc Button Toggle Mode…).
Managing KeypadLinc button status from Indigo
Managing the button states from Indigo is a more complex task, though not significantly so. First thing you're gonna want to do is carefully read INSTEON Button Basics. It's critical that you understand how INSTEON Groups/Scenes work before you continue.
Woohoo, you're now done with that. Head spinning? You might want to stew on that for a few minutes before you proceed. Grab a cup of tea. Achieve a nice Zen state.
So, let's walk through a couple of scenarios, each building on the last and each becoming more complex. These How-To's assume you've already defined the KPL in Indigo.
Scenario 1 - Linking a KPL button to an INSTEON light
- Select
DEVICES(or a subfolder) in the Outline View - Select your KPL in the list
- Click the
Edit…button - In the
Edit Devicedialog, click on theManage Links…button - In the
Manage INSTEON Device Linksdialog, clickNew Link to Responder- in this situation, the KPL is the controller and your device will be the responder - Select the button number on your controller you want to link the device to - on an 8 button KPL, the button numbering is obvious - start at the top left, then top right, then next row, etc. On a 6 button KPL, the large top button (load ON) is 1, the second row of 2 buttons is 3 and 4, next row 5 & 6, and the large bottom button (load off) is 7.
- Select the device you want to link the button to: many devices work but some don't (sprinklers, IRLincs, some IO devices). Those that do work, you may have some options: on lights, you can set the brightness and the ramp rate; on the thermostat, you can set mode and setpoints
- Click on the
Sync Nowbutton
OK, so, now, when you press the button on the KPL, it should control the device as you specified. Hold the button down to dim/brighten the light. Double tap the button to do an instant on/instant off. Pretty cool. And, if you watch the log, you'll notice that Indigo sees all this traffic. In fact, you can create trigger actions that do other things in conjunction with the KPL directly controlling the linked device. For instance, if you also want an X10 light to come on/go off, you can create trigger actions that look for an on/off from that button and issue the on/off X10 command to that light. Heck, you can even have the X10 device match the brightness of the other device (Pro only - requires writing some AppleScript).
Now, the KPL is directly controlling a device, and Indigo can see those button presses. On to the next scenario.
Scenario 2 - Controlling a KPL button from Indigo
Before we jump in, let's discuss why one would want to have Indigo turn on/off a button on a KPL. There are several possible reasons:
- You want the KPL button to represent the status of an X10 device
- You want the KPL to represent the state of some external device or software state
- You want to be able to flash it to impress your friends!
Anyway, now that you have some ideas. Indigo 5 introduced a new, simpler way to manage buttons. If you're using Indigo 5 or greater (and have a newer KPL), here's what you'll want to do if you want to control, say, button 3 on your KPL:
- In the Actions tab of a Trigger, Schedule, Action Group, or Control page, select
Control Light/Appliance - Select
Turn On Keypad Buttonin theActionmenu - Select your KPL from the
Devicepopup - Select
Button 3from the popup below theDevicepopup
This action will turn on the LED for that button. To turn it off instead, select Turn Off Keypad Button in the Action menu instead. If you see a warning that it won't work for your KPL (or you try it and it doesn't work), never fear. The next option will work.
If you're using Indigo 4 or greater (yes, it works equally well in Indigo 5+ and is in fact a bit faster), here's what you'll want to do:
- Select
Manage PowerLinc Linksfrom theInterfacemenu - Select an unused group number from the
PowerLinc Group/Scenepopup, and give it a name (I use “KPL button 3” as my naming scheme) - Select your KPL from the
responderpopup - Select the
controls 3rd button LEDfrom the popup next to theresponderpopup - Click the
Sync Nowbutton, and when that's done, click theClose (Sync Later)button
Great! Now, you can send the PowerLinc Group named “KPL button 3” an ON command to turn on the led behind KPL's button 3 and OFF to turn it off. Repeat these steps with any button whose status you want to control via Indigo. NOTE: for the buttons that control the load (1 on an 8 button KPL or 1/2 & 7/8 on a 6 button KPL), you don't need to do that - you can simply send an ON/OFF to the KPL directly.
Now you have a couple of options for controlling the KPL from Indigo.
Scenario 3 - Keeping a button in sync with iTunes playstate
This scenario assumes you have already defined an iTunes Server device (provided by the iTunes plugin included with Indigo).
So, here's the scenario: you want to have a button on your KPL that toggles iTunes play/pause, and that stays in sync with the current state of iTunes regardless of how it was changed (paused at the computer, via Apple's Remote iPhone App, etc.) There are a bunch of different ways to do this, and it's pretty easy. The iTunes Server device has a state, so a couple of Variable Changed triggers should do the trick:
- Select
TRIGGERS(or a subfolder) in the outline view - Click
New…to create a new trigger - Name the trigger, and select
Device State Changedfrom theTypepopup - Select your iTunes Server device from the
Devicepopup - Select
Player Status is Playing - Select the
Becomes Trueradio button - Select the
Actionstab - Select
Send INSTEON Group / Scene Commandfrom theTypepopup - Leave
Group Onselected from theSendpopup - Select the PowerLinc Group/Scene that you want to control (remember, from above, it's the group named “KPL button 3” - it's the one that represents the button on the KPL)
- Click
OK
That trigger will now turn on the button's LED when your iTunes Server device starts playing. Now, create another, just like it, except trigger it on Becomes False and send Group Off. That should keep the buttons in sync with the actual state of iTunes.
Next is the easy part - making the button play/pause iTunes:
- Select
TRIGGERSfrom the outline view on the left - Click the
New…button - Name the trigger “KPL - Play iTunes” (or whatever you want)
- Select
Insteon Command Receivedfrom theType:popup - Select
Onfrom the popup labeledReceived: - Select the KPL in the popup list beside the
Deviceradio button - Select the button/group you want to use (3 for this example)
- Click the
Actionstab - Select
Execute Scriptfrom theTypepopup - Make sure the
Embedded:radio button is checked - Select
Pythonfrom the popup - Type the following script into the text area below
Embedded: Python:itunesId = "com.perceptiveautomation.indigoplugin.itunes" itunesPlugin = indigo.server.getPlugin(itunesId) if itunesPlugin.isEnabled(): itunesPlugin.executeAction("play", deviceId=1234567890) # use the device id of your iTunes device - Click
OK(You've just created the trigger that will start iTunes playing - now, let's create the trigger that will pause iTunes) - Click the
New…button again - Name the trigger “KPL - Pause iTunes” (or whatever you want)
- Select
Insteon Command Receivedfrom theType:popup - Select
Offfrom the popup labeledReceived: - Select the KPL in the popup list beside the
Deviceradio button - Select the button/group you want to use (3 for this example)
- Click the
Actionstab - Select
Execute Scriptfrom theTypepopup - Make sure the
Embedded:radio button is checked - Select
Pythonfrom the popup - Type the following script into the text area below
Embedded: Python:itunesId = "com.perceptiveautomation.indigoplugin.itunes" itunesPlugin = indigo.server.getPlugin(itunesId) if itunesPlugin.isEnabled(): itunesPlugin.executeAction("pause", deviceId=1234567890) # use the device id of your iTunes device - Click
OK
That's it! Now, you have a button that controls iTunes Play/Pause, and always reflects the state of iTunes regardless of where it was last controlled from.


