Table of Contents
FanLinc and KeypadLinc
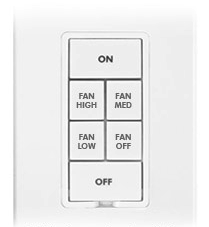
The FanLinc is a great device - it's custom made to control ceiling fans including the light kits attached. And, if you consider a 6-button KeypadLinc and how it might control a FanLinc, we think you'll see that they are a great combination:
When you look at the above image, it looks very logical and you would intuit that when you press the ON button the light goes on and when you press the OFF button the light goes off. Press and hold ON and it brightens, etc. When you press the FAN HIGH button the fan would switch to HIGH, etc. Think for a minute what the behavior of the LEDs on those center 4 buttons would be and you'd probably come up with the following: press HIGH and it would light up and the other three would be out. Press FAN MED and that light would go on and the FAN HIGH button would go out. Logical, right?
This functionality is called (in most UI terminology) a radio group. One and only one button must be lit at a time. This is not how KeypadLinc buttons work by default - they generally work independently of one another. You can, however, tell the KeypadLinc to create radio groups like that. It can be done manually at the KeypadLinc (read the supplied instructions that came with your KeypadLinc for details) but it's quite tedious. Because we figured a good number of you might be interested in doing this, we added some Insteon commands that will allow you to configure the KeypadLinc so that it has a radio group like this.
In fact, there are two parts to setting up a radio group. First, you have to configure which buttons go OFF when another button is pressed. So, for instance, when you press the FAN HIGH button (button 3 in INSTEON terminology), you want the FAN MED, FAN LOW, and FAN OFF buttons to go off if they're on. And so on for each of the other buttons. Each of these is a separate INSTEON instruction to the KeypadLinc.
But that doesn't get you all the way there - the buttons are still toggling between ON and OFF which you don't want - you always want one and only one button lit because one of the buttons represents OFF. So the next step you want to take is to set each of the buttons into Non-Toggle Mode - and have the button always send an ON command when pressed (so it lights up if it's not already lit).
Ok - so we've established that there are two steps to creating a radio group: create the Auto-Off groups for each button then put each button into Non-Toggle mode and tell them to send ON every time. How do you actually do it? First, you need to create the KeypadLinc radio groups (only available in Pro versions).
Creating Radio Groups in Indigo 6 Pro and above
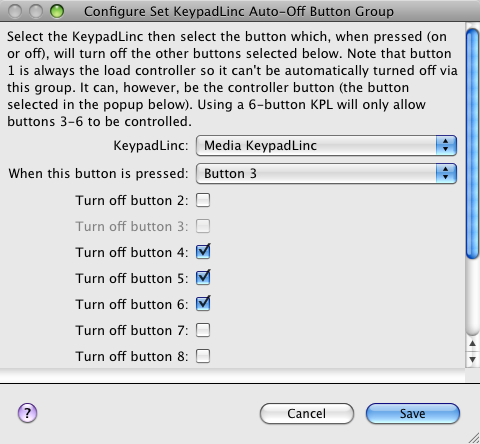
In Indigo 6, we added some convenient menu items on the Interfaces→Insteon/X10 Power Line submenu to perform some advanced Insteon configuration functions. First, you want to create the auto-off button groups which will cause the other buttons to go off when one of the buttons is pressed (goes on). Select the Interfaces→Insteon/X10 Power Line→Set KeypadLinc Auto-Off Button Group… menu item, and you'll see this dialog:
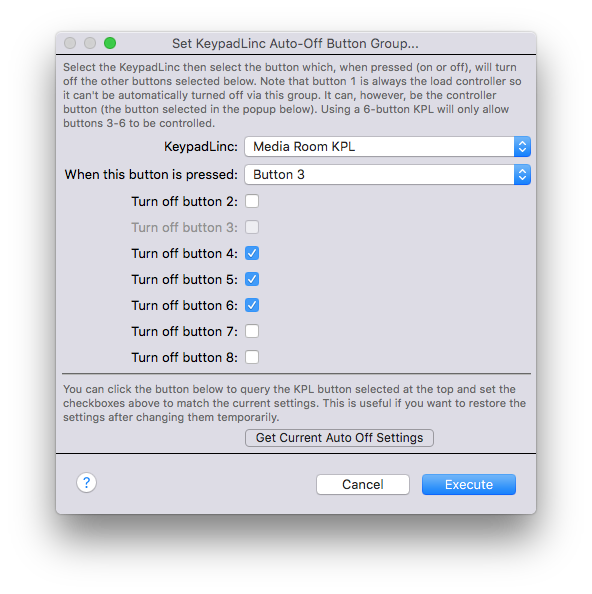
Select the KeypadLinc you want to work with from the KeypadLinc popup. Then, for each button in the group, repeat these steps:
- Select a button in the group (for instance, button 3) that, when pressed, should cause the other buttons to go out
- Select the checkboxes next to the other buttons in the group (for instance, 4, 5, and 6) that should go out when the button selected above is pressed
- Click
Execute
Repeat for buttons 4-6. This creates the auto off functionality.
Setting buttons into non-toggle mode
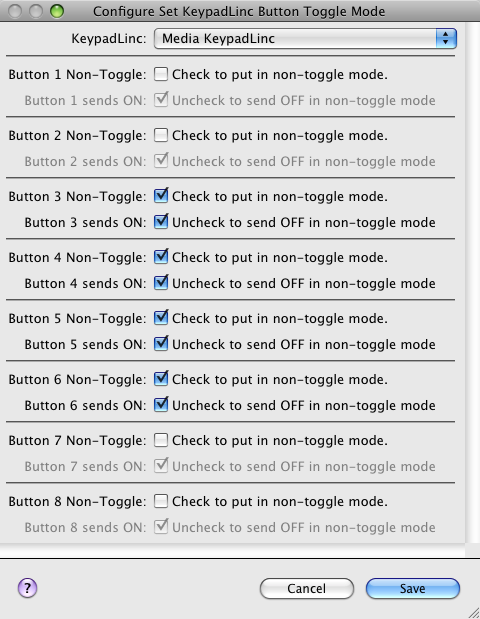
Next, we want to configure the buttons to always go ON (and send the ON command) when pressed. This is called non-toggle mode because the buttons don't toggle on and off when you press them. Select the Interfaces→Insteon/X10 Power Line→Set KeypadLinc Button Toggle Mode… menu item, and you'll see this dialog:
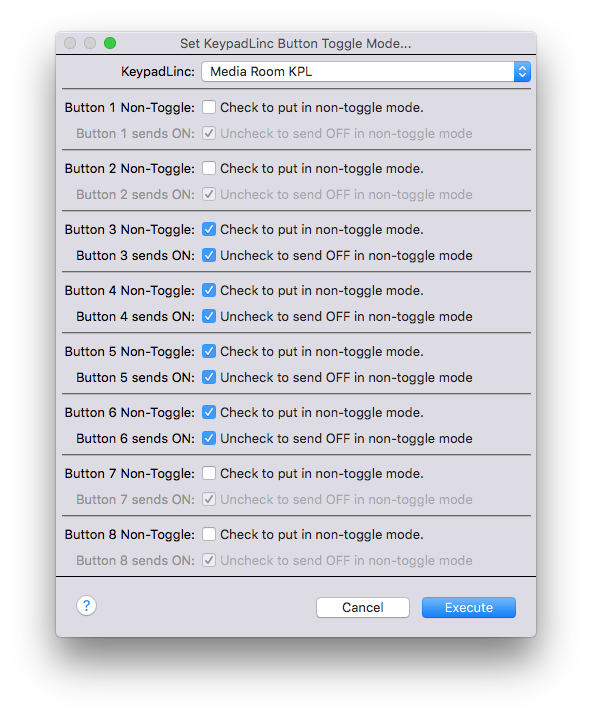
Select the Non-Toggle checkbox for each button in the group (3, 4, 5, and 6). Leave the Button X sends ON checkbox checked, since you want those buttons to always send ON commands. When you have them all selected, click Execute.
That's it - your buttons are now configured in a radio group. Proceed to the Creating the Links section for the next steps.
Creating Radio Groups in Indigo 5 Pro
With Indigo 5.1.1 we released a plugin called INSTEON Commands. This plugin allowed us to add more obscure and/or advanced INSTEON commands to Indigo more quickly than adding it natively to the Mac client UI.
What you'll do is create an Action Group that executes several plugin actions, each of which will send the appropriate commands to the KeypadLinc. Once you've created the Action Group, you will execute it and several seconds later your KeypadLinc will be configured correctly. Specifically, you'll need to use two of the actions in this plugin to create your radio group. First, an Action Group (called “Set up radio group” or something) and create a Set KeypadLinc Auto-Off Button Group for each button (3-6) that will turn OFF all the other buttons. For instance, here's the configuration for button 3:
Repeat the action for each of the other (4-6) buttons, turning off the rest. Next, create a Set KeypadLinc Button Toggle Mode action that sets buttons 3-6 to Non-Toggle mode (and leave the Button # sends ON checkboxes checked):
That's it - execute the Action Group and the buttons should be set up such that when you press one it will go on and the others will go off. If not, revisit each of your actions and make sure that you have them configured correctly.
Creating the Links
Good - you've taken the first step to get your 6 button KeypadLinc controlling your FanLinc. The next step is to link the KeypadLinc buttons to the FanLinc so that when you press them they control the fan and light respectively. Creating INSTEON links is covered in the Managing INSTEON Device Links document - you want to link button 1 to the FanLinc lights and buttons 3-6 to high, medium, low, and off respectively.
Congratulations! You now have they KeypadLinc directly controlling fan speeds via the middle 4 buttons and the fan light being controlled by the top and bottom buttons. Done!
Almost Done
Well, we're almost done. If you never intend to control the fan from Indigo, then yes, you're done. However, if you also want to control the fan from Indigo as well as from the KeypadLinc, you need to do just a bit more work. As you might have read in the multi-way groups and KeypadLinc Buttons articles, keeping KeypadLinc buttons in sync when controlling the lights they're linked to requires a little more work. This is because when you control a device from Indigo, we have to use direct commands. This will not cause the links you've created between devices to be activated (there isn't a way to simulate a button press on a KPL to cause that behavior). Because of that, the KeypadLinc buttons that are linked to other devices can get out of sync if the device is controlled from Indigo.
One other thing that complicates this particular scenario is the fact that Indigo can't create multiple links to the same device in a single group. For instance, you can't create a PowerLinc scene that includes multiple buttons on the same KeypadLinc. This is a limitation in Indigo that's not likely to be overcome soon because of the nature of how those links are maintained and how Indigo treats devices and links. Because of these things, you'll need to control the FanLinc Fan through Action Groups (rather than directly) so that the KeypadLinc's buttons will stay in sync. Fear not, there's an action in the Insteon Actions section that will help with that as well.
The simplest approach is to create 4 triggers - one each for when the Fan speed becomes High, Medium, Low, and Off. The action for those actions will be to set the KPL's button LEDs appropriately. Rather than setting each LED separately using the built-in mechanism for setting LEDs (which would require a lot of INSTEON communication), you can use the Turn On/Off KeypadLinc Buttons action in the in the Insteon Actions section of the Action type popup. That will only send 1 command to the KPL to set the state of all buttons. So, for the trigger that fires when the Fan speed becomes High, in the action's config dialog you would select the KeypadLinc, then select Turn Off for buttons 1, 2, 4, 5, 6, 7, 8 and Turn On for button 3. Now, you might be asking yourself why we'd want to turn off 1, 2, 7, and 8. Actually, because this is a 6 button KeypadLinc, those actions will be ignored since 1 and 2 are the load ON button and 7 and 8 are the load OFF button. The only important ones to turn off are 4 (Medium), 5 (Low), and 6 (Off) since the fan is on High and turn button 3 (High) on. Now, if you're operating the switch buttons manually, this will already be the case - but that's OK. If you're operating the fan from somewhere else - like a control page - this will keep the KeypadLinc's LEDs in sync.

