Table of Contents
Indigo Control Page Design
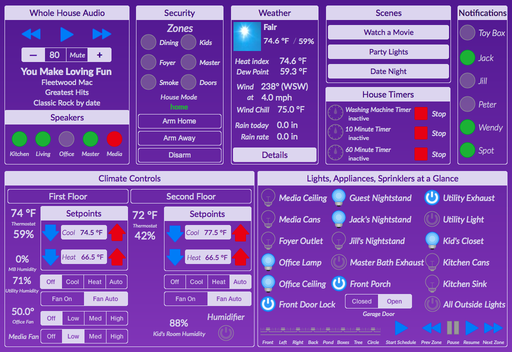
Indigo has some built-in graphics that can be used to design great looking pages. Our Demo Server has several great examples. Here's one example:

All of the images on that page are included with Indigo, so you can use them as well. In this article, we'll discuss the various images and how best to use them. Along the way we'll give you a few tips for using the control page editor more effectively. You can also use custom images on my control pages to represent the state of a device or the value of a variable. It's quite flexible.
The control page editor provides the following page size presets:
- iPad Portrait
- iPad Portrait Retina
- iPad Landscape
- iPad Landscape Retina
- iPhone 6 Plus Portrait
- iPhone 6 Plus Portrait Retina
- iPhone 6 Plus Landscape
- iPhone 6 Plus Landscape Retina
- iPhone 6 Portrait
- iPhone 6 Portrait Retina
- iPhone 6 Landscape
- iPhone 6 Landscape Retina
- iPhone 5 Portrait
- iPhone 5 Portrait Retina
- iPhone 5 Landscape
- iPhone 5 Landscape Retina
- iPhone 4 Portrait
- iPhone 4 Portrait Retina
- iPhone 4 Landscape
- iPhone 4 Landscape Retina
- Full HD Portrait
- Full HD Landscape
- Quad HD Portrait
- Quad HD Landscape
Each of these presets represent the exact size that a control page needs to be such that when Indigo renders it in Indigo Touch for iOS (with the tab bar hidden), the page will not need to scroll and the maximum visible screen will be available to you.
The final addition to the control page editor (and Indigo Touch for Web and iOS) is a new font called Lato. It's a beautiful font that's reminiscent of Helvetia Neue (the default iOS font since iOS 7). We've included 3 weights and the italic version of each. This will give you much more design flexibility.
Pick the Right Size
You'll notice there are both retina and non-retina versions of the presets listed above. We supply both (even though all the supported iPhones have retina displays) because if you use some of your own images, and those images are not retina images, they will show up on a retina sized page at one-half the size and that may not be desirable. We supply all images in both 1x and 2x (retina) versions.
In general, using a retina page size will result in a better looking design. The downside is that it's a bit more difficult to design one since, on the Mac in the control page editor, the page is likely to be quite large and you'll need to scroll the editor window around a bit. However, the end result will look much better.
While you may not want to design a different set of pages for all the different iOS devices you use, we recommend that you design at least one iPhone page and one iPad page (assuming you have both types of devices) since the iPad screens tend to give you much more real estate to work with.
Device Status Images
We've included two sets of device images: one set is specifically meant to show status and is exactly the images used in the Indigo Touch for iOS device lists and in the Mac Client. Here's a list of those images (these are the 1x variety, but they all also come in 2x):
| Image Name | Off Variation | On Variation | Notes |
|---|---|---|---|
Ambient Light Sensor.png |  |  | The image is the same for on and off until we determine that there's a need for a different on variation. |
Dimmable Light.png |  |  | Use with a device that supports on/off states. |
Fan.png |  |  | Useful for an on/off device that controls a fan. |
Green Dot.png |  |  | Useful for an on/off device when on represents something good/positive. |
Humidity Sensor.png |  |  | The image is the same for on and off until we determine that there's a need for a different on variation. |
Motion Sensor.png |  |  | |
Power Meter.png |  |  | The image is the same for on and off until we determine that there's a need for a different on variation. |
Red Dot.png |  |  | Useful for an on/off device when on represents something bad/negative. |
Sprinkler.png |  |  | Useful to represent a single sprinkler zone's on/off state. |
Switch.png |  |  | Use with a device that supports on/off states. |
Temperature Sensor.png |  |  | Use with a device that detects temperatures. |
There are a few images that are used for devices that have multiple states:
Media Play State+.png |
|
|---|---|
 | used when the play state of the media device is “paused” |
 | used when the play state of the media device is “playing” |
 | used when the play state of the media device is “stopped” |
| These images are useful for any device that is capable of playing any kind of media (audio, video, discs, etc). The built-in iTunes Plugin is one example. | |
Timer+.png |
|
|---|---|
 | shows when the timer is active (running) |
 | shows when the timer is paused (same as active for the moment) |
 | shows when the timer is inactive |
| These images are useful to represent the state of timers from the Timers and Pesters Plugin. | |
Device Control Images
We've also included a set of light-colored device control images (don't worry, when placed against a dark background, these images look great - just check out the example at the top of this page). These images are specially designed to both reflect status and mimic the iOS built-in controls. This way you can create pages that contain controls for as many devices as you like that operate similarly to the controls for a device in the Devices tab. The files are all prepended with “Light” to indicate their color - we may include a “Dark” themed set in a future release. All images come in both 1x and 2x (retina) varieties.
Light Fan Control+.png |
|
|---|---|
 | used when the fan state is “off” |
 | used when the fan state is “low” |
 | used when the fan state is “medium” |
 | used when the fan state is “high” |
These images are useful for any speed/motor control device that has 4 states, primarily ceiling fans. Because control pages don't implement segmented buttons, you can't have a tap in each individual cell react differently - only taps on the whole image will be registered. However, we've implemented a special action that will cycle through the fan speeds - on the action for the page element, select the Device Actions→Fan Speed Controls→Cycle Through Speed Control (FanLinc) States menu item. This will cause the fan speed to cycle each time the page element is tapped/clicked in the following way: Off→High→Medium→Low→Off. This works the same way the pull chain on a ceiling fan traditionally operates. |
|
Light Garage Door Control.png |
|
|---|---|
 | used when the door state is “off” |
 | used when the door state is “on” |
These images are useful for garage door controllers - for instance, the Insteon I/O Linc with a garage door kit. The action for the Insteon solution is Device Actions→Input/Output Controls→Turn On Output and select output 1. Other garage door solutions will depend on how they are implemented. |
|
Light Thermostat Fan Control.png |
|
|---|---|
 | used when the fan state is “always on” |
 | used when the fan state is “auto on” |
Use these images for the fan control on a thermostat. The action is Device Actions→Thermostat Controls→Toggle Thermostat Fan Mode. |
|
Light Thermostat Mode Control.png |
|
|---|---|
 | used when the mode is “all off” |
 | used when the mode is “cool on” |
 | used when the mode is “cool on” |
 | used when the mode is “cool on” |
Use these images for the thermostat mode. The action is Device Actions→Thermostat Controls→Cycle Through Thermostat Modes. The cycle order is: Off→Cool→Heat→Auto→Off. |
|
We also have included one specific set of images that you can use with the iTunes plugin that will allow a single control page element to behave like the play/pause button does in iTunes (or virtually any other media player app). When the player is stopped or paused, the button actually shows the play icon to indicate that it's the one to click/tap to begin playing. When the player is playing, the icon is usually the pause symbol, which indicates that when you tap it it will pause. When the player is paused, it also shows the play image to indicate that tapping it will cause it to start playing.
Use the following image to accomplish that behavior:
Media Play Pause Control+.png |
|
|---|---|
 | used when the play state of the media device is “paused” |
 | used when the play state of the media device is “playing” |
 | used when the play state of the media device is “stopped” |
Use the action Device Actions→iTunes Controls→Toggle Play/Pause for this element. |
|
Variable Images
Airfoil Speaker+.png |
|
|---|---|
 | used when the speaker variable value is “connected” |
 | used when the speaker variable value is “disconnected” |
 | used when the speaker variable value is “unavailable” (or any other value besides the ones above) |
Use these images for the speaker variables that the Airfoil plugin creates. The action is Airfoil Actions→Toggle Speaker. |
|
Green Dot.png |
|
|---|---|
 | used when the variable value is: false, off, 0 |
 | used when the variable value is anything else |
| Use these images for a variable that has some kind of boolean value (true/false, on/off, etc). | |
Red Dot.png |
|
|---|---|
 | used when the variable value is: false, off, 0 |
 | used when the variable value is anything else |
| Use these images for a variable that has some kind of boolean value (true/false, on/off, etc). | |
Red Green Dot.png |
|
|---|---|
 | used when the variable value is: false, off, 0 |
 | used when the variable value is anything else |
| Use these images for a variable that has some kind of boolean value (true/false, on/off, etc). False is red, true (or anything else) is green. | |
Static Images
There are three groups of static images: straight control images which are colored and are used in other places in Indigo Touch; buttons that you can use for any use (execute scenes, change to different pages, etc.); and tiles that can group other page elements and buttons. Once again, all images are available in 1x and 2x (retina).
Control Images
| Filename | Image | Usage |
|---|---|---|
Down Arrow.png |  | Useful for indicating an action that reduces - like lowering a setpoint on a thermostat or volume. |
Up Arrow.png |  | Useful for indicating an action that increases - like raising a setpoint on a thermostat or volume. |
Media Play.png |  | Useful for starting something. |
Media Pause.png |  | Useful for pausing something. |
Media Stop.png |  | Useful for stopping something. |
Media Next.png |  | Useful for changing something to the next: next track in a media player, next sprinkler zone, etc. |
Media Previous.png |  | Useful for changing something to the previous: previous track in a media player, previous sprinkler zone, etc. |
Generic Buttons
We have several different sizes and styles of buttons. This will allow you to create just the right combination of styles for your page.
| Filename | Image | Notes |
|---|---|---|
Light Button Outline Small.png |  | The inside is transparent, so you'll want to add a text caption that's also light in color to contrast with the dark background. |
Light Button Outline Medium.png |  | The inside is transparent, so you'll want to add a text caption that's also light in color to contrast with the dark background. |
Light Button Outline Large.png |  | The inside is transparent, so you'll want to add a text caption that's also light in color to contrast with the dark background. |
Light Button Solid Small.png |  | The inside is filled, so you'll want to add a dark text caption (hint, select a color that matches the background color where the button sits. |
Light Button Solid Medium.png |  | The inside is filled, so you'll want to add a dark text caption (hint, select a color that matches the background color where the button sits. |
Light Button Solid Large.png |  | The inside is filled, so you'll want to add a dark text caption (hint, select a color that matches the background color where the button sits. |
Light Button Segment Solid Left.png |  | Use this button to represent the left half of a segmented button. To use the left and right together, position them with a 1 pixel gap between to simulate a two segment button. |
Light Button Segment Solid Right.png |  | Use this button to represent the left half of a segmented button. To use the left and right together, position them with a 1 pixel gap between to simulate a two segment button. |
| A neat trick is to use the regular outline buttons above, then place the solid left and right buttons on top of each end of the outline button. This creates a blank space between the two end buttons for additional actions/captions. See the iPhone 6 Retina control page on the demo server for an example: the Whole House Audio up and down controls, with the volume level in between, is an example of this technique. | ||
Light Button Segment Outline Left.png |  | The inside of this button is transparent, so pick a light color for the text caption so it will show on your dark backgrounds. Overlay the flat end of the button with the flat side of the opposite button to create a simple two button segmented control. |
Light Button Segment Outline Right.png |  | The inside of this button is transparent, so pick a light color for the text caption so it will show on your dark backgrounds. Overlay the flat end of the button with the flat side of the opposite button to create a simple two button segmented control. |
Tiles
These images are used to create the “tiles” you see in the image at the top of the page that we use to group other control page images. Because the control page editor is not a full-fledged draw program, nor does it support resizing of images, constructing something as complex as a tile with arbitrary width and height is challenging.
We decided to create a set of building blocks that will enable you to create many sizes of groupings. Basically, a tile is made up of three parts: the header, any number of body images that are overlayed, and the footer. We've supplied 4 widths of tile images for each part: small, medium, large, and xlarge.
So - how to you build a tile? The best place is to start with the right header size that you'll need to contain all of the other page elements you want to enclose in the tile:
| Filename | Image |
|---|---|
| Light Tile Header Small.png |  |
| Light Tile Header Medium |  |
| Light Tile Header Large.png |  |
| Light Tile Header X-Large.png |  |
You'll notice that the top right and left corners are rounded, but the lower left and right corners are not. This is so that you can add a body tile just below the header to form the area into which you can put other page elements. The body tiles are quite simple - just a vertical line on the left and right sides of the image, and come in the same widths as the headers. The area in between the two images is transparent so anything below will show through. Here are the body images:
| Filename | Image |
|---|---|
| Light Tile Body Small.png |  |
| Light Tile Body Medium |  |
| Light Tile Body Large.png |  |
| Light Tile Body X-Large.png |  |
So, the interesting characteristic of these body tiles is that they are transparent except for the left and right lines. This allows you to stack/overlay as many as you like to create the size you need. For instance, let's say you need a tile that's 200px high. The tile body image is only 122px high. How do you make one that's exactly the right size? Simple: add two tile bodies, and overlay one on top of the other such that combined they make about 200px high. Because the inside is transparent, nothing shows where the images overlap. It appears to be a single body that's 200px high. The best way to get a feel for this is to just open the control page editor, insert several body images, and stack them up to see how it works. Experimentation is always the best way to learn.
Finally, let's have a look at the footer images:
| Filename | Image |
|---|---|
| Light Tile Footer Small.png |  |
| Light Tile Footer Medium |  |
| Light Tile Footer Large.png |  |
| Light Tile Footer X-Large.png |  |
These are pretty simple images as well - it's just the rounded corners connected by a single line. You position these against the bottom of a body tile of the same size and it'll finish out the tile.
Tile Design Tips
Now, a few tips about designing pages that have tiles. The control page editor does not allow you to layer/lock specific images. This means that when you want to select a certain group of page elements and those elements are layered on top of something like the body tiles, then you can't effectively do a drag select because the body tile itself will also be selected (you can deselect it by shift-clicking on the body tile when you have a group of page elements selected). Shift-clicking on multiple images will select them one at a time (just like all other image applications on the Mac).
I've found that the best way to design a tile is to just add the header, then start positioning the page elements you want under the header and inside what the outside edges will be. That way, the body tile images themselves won't get in the way when you are repositioning groups of page elements.
Once you get all of the enclosed page elements added and in approximately the right position, then you can add the necessary body and footer images. One downside to this approach, though, is that the body images will now be layered on top of all of the enclosed page elements. However, you can just edit the z-order, or the order of the page elements on the page. Click the “Edit z-order” checkbox at the top of the control page editor. Then, select the tile you want to move to the back and click the little down arrow with a line under it. That will move it all the way to the bottom of the layering order. You'll then be able to click each of the page elements that are on top of the body image.
A few other points: once you have a page element selected, you can use the arrow keys to nudge the element one pixel in each direction. If you hold down the shift key, it will move them 10 pixels at a time. Another tip is when you are trying to line up several different page elements, say, based on the text caption that's on them: add one of the larger header images, and move it to under the text caption part of one of the page elements. You can then nudge the rest of them so that the text all lines up (it's a poor man's ruler).
The control page editor is a complex tool. Playing around with it some will help you figure out your own tips/tricks for designing great looking control pages. We hope these images will help you more easily create cool control pages.
